

Voice recording on Windows 11 opens up a world of possibilities. Whether you’re capturing ideas, creating podcasts, or simply documenting your thoughts, the process is straightforward and accessible. With its user-friendly interface and powerful features, Windows 11 makes it easier than ever to record voice with clarity and precision.
Imagine having all your audio needs met right from your computer. You don’t need an expensive studio setup or complicated software to get started. Whether you’re a beginner or someone looking to enhance their audio projects, this guide will walk you through everything you need to know about recording voice on this innovative operating system.
Step-by-Step Guide to Record Voice on Windows 11
Step 1: Open the Sound Recorder App
Click the Start menu and type “Sound Recorder” in the search bar. Select the app from the results to launch it. Ensure your microphone is connected and recognized by Windows so the app can detect and capture clear audio input.
Step 2: Configure Microphone Settings
Before recording, check your microphone levels. Go to Settings, then System, and select Sound. Under Input, choose your microphone and test it. Adjust input volume if needed to avoid distortion or low sound, ensuring your voice is recorded clearly.
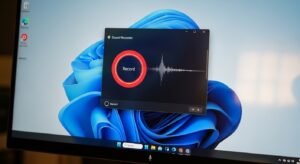
Step 3: Start, Stop, and Save Your Recording
Return to the Sound Recorder app and press the Record button to begin. Speak clearly into the microphone. When finished, click Stop. Your recording saves automatically. Rename and organize the file so you can easily find and use it later.
Tips for High-Quality Voice Recording on Windows 11
To achieve high-quality voice recordings on Windows 11, start by selecting a quiet environment. Background noise can diminish audio clarity.
Investing in a good microphone is essential. USB microphones often provide better sound quality than built-in options.
Use pop filters to reduce plosive sounds that can distort your recording. These simple tools help maintain vocal clarity.
Adjust microphone settings in the system’s sound control panel. Setting the appropriate levels prevents distortion and ensures optimal capture of your voice.
Experiment with different recording distances until you find the sweet spot where your voice sounds natural and balanced.
Monitor your record voice using headphones to catch any issues as they occur, allowing for immediate adjustments if needed.
Best Practices for Saving and Sharing Recorded Voice Files
Once you’ve successfully recorded your voice, saving and sharing the file correctly is crucial. Start by choosing an appropriate format. MP3 is widely used for its balance of quality and size, but WAV files offer higher fidelity if you’re focused on sound clarity.
Organize your recordings with meaningful file names. This makes it easier to find specific sessions later on, especially if you plan to create a library of recordings.
When sharing your audio files, consider cloud storage options like Google Drive or Dropbox. These platforms allow easy access while ensuring that your data remains secure.
For collaboration or feedback purposes, use platforms that support record voice playback directly in the browser. This eliminates the hassle of downloading files for recipients and encourages quicker responses.
Always remember to check the privacy settings before sharing sensitive information through any platform—keeping your content safe should be a priority.
Why Use Windows 11 for Voice Recording
Windows 11 offers a modern and user-friendly interface, making voice recording intuitive. The streamlined design allows users to navigate easily through applications without unnecessary distractions.
It comes equipped with built-in features that enhance audio quality. With advanced sound processing capabilities, your recordings can be clear and professional-grade.
Compatibility is another advantage. Windows 11 supports a variety of third-party recording software, providing flexibility based on individual preferences or needs.
Additionally, security enhancements in Windows 11 help protect your record voice files from unauthorized access. This ensures peace of mind while creating personal or professional content.
The integration with Microsoft services also adds value. You can seamlessly save and share recordings through OneDrive or other cloud solutions directly from your device.
How to Record Audio Using the Sound Recorder App

To record audio using the built-in Sound Recorder app on Windows 11, start by locating it in your applications. You can easily find it via the Start menu or search bar.
Once opened, you’ll see a simple interface. Click on the microphone icon to initiate recording. Before you begin, ensure that your microphone is properly connected and configured in the system settings.
It’s wise to conduct a quick test run to check audio levels. After hitting record, speak clearly or play your desired sound.
When you’re finished, click the stop button. Your recording will automatically save in default locations unless specified otherwise.
You can access recorded files through File Explorer for easy playback and management. The simplicity of this application makes voice recording straightforward for anyone looking to capture audio quickly without any frills.
How to Record Voice with Third-Party Software
Using third-party software to record voice on Windows 11 can elevate your record voice audio quality and provide additional features. Several applications cater to different needs, whether you’re a podcaster or just recording notes.
Audacity is a popular choice due to its robust editing capabilities. It’s free and open-source, making it accessible for everyone. Simply download the software, select your microphone as the input device, and hit record.
Another fantastic option is OBS Studio. Originally designed for video streaming, it also excels at audio capture. You can customize settings extensively to achieve professional results.
For those looking for simplicity, consider tools like record voice Banana or Wave Pad Audio Editor. They offer user-friendly interfaces while still providing excellent sound quality.
Experiment with these programs to find one that suits you best; each has unique functionalities that enhance your recording experience on Windows 11.
Why Use Windows 11 for Voice Recording
Windows 11 brings a fresh and modern interface that enhances the user experience, making record voice easier than ever. The redesigned layout is intuitive, allowing users to navigate quickly through apps and settings.
The built-in tools are another significant advantage. With features like Voice Recorder, users can start recording with just a few clicks. This eliminates the need for additional software for basic tasks.
Moreover, Windows 11 supports various audio record voice formats, ensuring flexibility when saving your recordings. Whether you’re capturing notes or creating podcasts, compatibility won’t be an issue.
Performance is also enhanced in Windows 11. Improved hardware integration means better sound quality and more reliable recordings without lag or interruptions.
Regular updates ensure that security vulnerabilities are addressed promptly. Recording sensitive information becomes safer on this platform compared to older operating systems.
Conclusion
Recording voice on Windows 11 is a straightforward process that opens up various creative and professional opportunities. With the built-in Sound Recorder app, you can easily capture your thoughts or create high-quality audio clips for presentations, podcasts, and more.
If you’re looking for advanced features, numerous third-party software options offer additional functionalities to enhance your record voice experience.
By following the step-by-step guide provided in this article, you can ensure that your recordings are clear and professional. Remember to consider tips for achieving high quality and best practices when saving and sharing your files.