

Replace a graphics card can feel like breathing new life into your computer. Whether you’re a gamer craving stunning visuals or a creative professional in need of powerful rendering capabilities, the right graphics card can make all the difference.
But what happens when your trusty old GPU just can’t keep up anymore? replace a graphics card it might seem daunting, but fear not—it’s entirely doable with a little guidance! Let’s dive into everything you need to know about replacing that essential piece of hardware and unlocking the full potential of your system.
Reasons for Replacing a Graphics Card
Graphics cards are essential for delivering rich visuals and smooth performance in gaming, design, and video editing. Over time, you might find that your current card struggles to keep up with demanding applications or games.
One common reason for replacement is the need for better performance. As software evolves, newer titles often require more graphical power than older cards can provide.
Another factor could be overheating issues or increased noise during operation. If your graphics card is constantly running hot or sounding like a jet engine, it may be time to upgrade.
You may also want to enhance features like ray tracing or higher resolutions. A modern graphics card can make these experiences much more immersive.
If you’re facing compatibility issues with new hardware components—like motherboards or processors—a new graphics card might just be the solution you need to ensure everything works harmoniously together.
Things to Consider Before Replacing a Graphics Card
Before diving into the replace a graphics card replacement process, it’s crucial to evaluate a few key factors.
First, check your system compatibility. Not all cards fit every motherboard or computer case. Ensure the new card matches your specifications.
Next, consider power requirements. Newer models often demand more wattage than older ones. Verify that your power supply can handle this upgrade without issues.
Budget is another significant factor. replace a graphics card come in various price ranges, and while high-end options offer exceptional performance, mid-range cards may suffice for everyday gaming or tasks.
Think about future-proofing your setup. Opting for a slightly more powerful card today could save you from needing another upgrade too soon.
Step-by-Step Guide on How to replace a graphics card
Before you begin, make sure you have all the necessary tools. You’ll need a screwdriver, anti-static wrist strap, and maybe some zip ties for cable management.
Next, shut down your computer. Unplug it from the power source to eliminate any risk of shock or damage.
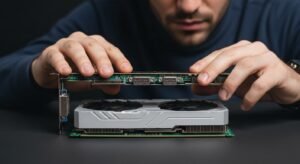
Carefully open your computer case. Most cases have screws at the back that hold them in place. Once open, locate replace a graphics card—it’s usually seated in one of the PCIe slots on the motherboard.
To remove it, unscrew any brackets securing it to the case and gently pull upward until it’s free. Avoid using excessive force; if it’s stubborn, check for additional screws or clips.
Now grab replace a graphics card! Align it with the same PCIe slot and press down firmly until it clicks into place. Secure it with screws as before to ensure a snug fit.
Gathering Necessary Tools and Equipment
Before diving into the replacement process, it’s essential to gather the right tools and equipment. Having everything at hand can make a significant difference in efficiency.
Start with a screwdriver set, preferably magnetic. This will help you easily handle screws without losing them. A pair of anti-static wrist straps is also crucial to prevent any electrical damage to your components.
Next up, consider having a flashlight or good lighting nearby. Sometimes those tight spaces within your computer case can be quite dark.
You might want some thermal paste on standby too. This ensures optimal heat transfer if you’re installing a new graphics card that requires it.
Don’t forget about cable ties for managing cables after installation. Keeping things organized not only looks better but also improves airflow inside your case!
Preparing the Computer for Installation
Before diving into the installation process, it’s crucial to prepare your computer properly. First, power down your machine completely and unplug it from the wall. This helps prevent any accidental shocks.
Next, find a clean workspace with good lighting. You’ll want enough room to maneuver easily around your computer case without risking damage to components or dust contamination.
Open up the case by removing screws or sliding off panels carefully. Make sure you follow manufacturer guidelines for accessing internal components safely.
Ground yourself by touching a metal part of the case before handling any hardware. This prevents static electricity buildup that can harm sensitive electronics.
Check if your replace a graphics card requires additional power connectors. Familiarize yourself with where they’ll plug in so that you’re ready when it’s time to connect everything efficiently.
Removing the Old Graphics Card
Before replace a graphics card, ensure that you have safely powered down your computer and unplugged it from the outlet. This step is crucial to avoid any electrical mishaps.
Next, locate the screws securing the graphics card to the case. These are usually found at the back of your PC. Carefully unscrew them and set them aside in a safe spot for later use.
Now, gently but firmly pull on the latch or lever of the PCIe slot where your graphics card is installed. This mechanism holds your card securely in place.
With one hand on the replace a graphics card bracket and another supporting its base, slowly lift it out of the slot. Avoid using excessive force; if it’s stuck, double-check that all screws and latches are properly disengaged before trying again.
Once free, place it on an anti-static surface to protect both components during this transition process.
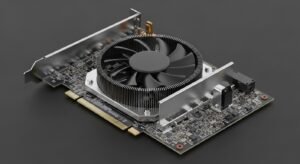
Installing the New Graphics Card
With the old graphics card out, it’s time to bring in the new. Begin by aligning your new graphics card with the PCI Express slot on your motherboard. Make sure you handle it carefully; avoid touching any of its connectors or components.
Gently push down until you feel it click into place. You might need to apply some firm pressure, but be cautious not to force it too hard, as this could damage both the card and your motherboard.
Once seated securely, use screws to fasten the card to the case bracket. This ensures stability and prevents shifting during operation.
Next, check for any additional power connectors needed for your new graphics card and attach them accordingly. Each model varies slightly; following specific instructions can help achieve proper installation without issues later on.
Troubleshooting Common Issues during Replacement
After replace a graphics card, you might encounter some hiccups. It’s not uncommon for issues to arise during this process.
First, check if the replace a graphics card is seated correctly in the PCIe slot. A loose connection can prevent your computer from recognizing it. Gently remove and reinsert the card to ensure a snug fit.
Next, verify that all power connectors are securely attached. Insufficient power supply can lead to underperformance or failure to boot altogether.
If you’re facing display problems like artifacts or black screens, updating your drivers may help. Sometimes outdated software causes compatibility issues with newer hardware.
Listen for any unusual sounds coming from the system after installation. If you hear beeping noises, refer to your motherboard manual; it usually indicates specific errors related to hardware setup. Don’t panic—most of these issues have straightforward solutions!
Conclusion
Replace a graphics card can feel like a daunting task, but with the right guidance, it becomes manageable. This upgrade not only enhances your gaming experience but also improves productivity for graphic design or video editing tasks. With careful planning and execution, you can elevate your computer’s performance significantly.
Whether you’re upgrading for better frame rates in games or simply want to take advantage of new technology, understanding each step along the way is crucial. Always remember to ensure compatibility between components and keep track of any warranties that may be affected by modifications.
As you move forward with your computer upgrade journey, embrace the potential improvements that come from replacing an old replace a graphics card. Your system will thank you with enhanced visuals and responsiveness, taking both your gaming sessions and creative projects to new heights. Happy upgrading!