

If you’re diving into the world of computer hardware, understanding how to handle your GPU is essential. Whether you’re upgrading your graphics card for better gaming performance, troubleshooting an issue, or even cleaning out dust build-up in your PC case,
Knowing how to remove a GPU from the motherboard can save you time and frustration. This process may seem daunting at first, but with the right tools and steps, anyone can do it safely and efficiently.
Let’s explore everything you need to know about removing that powerful graphics processing unit from its home on the motherboard!
Importance of Removing a GPU from a Motherboard
Removing a GPU from the motherboard is crucial for several reasons. First, upgrading your graphics card can significantly enhance your system’s performance. Newer GPUs come packed with advanced technology that can improve frame rates and visual fidelity in games.
Another important factor is maintenance. Dust accumulation over time can affect thermal performance and lead to overheating issues. Removing the GPU allows you to clean it thoroughly, ensuring it runs efficiently.
Additionally, troubleshooting becomes easier when you detach components individually. If you’re experiencing graphical glitches or crashes, isolating the GPU helps identify whether it’s at fault.
If you’re building a new PC or transitioning parts between systems, removing the GPU correctly ensures no damage occurs during transport. Understanding this process empowers users to take control of their hardware setups confidently.
Tools Needed for the Process
Before diving into the task of removing your GPU, gather a few essential tools. Having everything ready will streamline the process.
First, you’ll need a Phillips-head screwdriver. This tool is crucial for unscrewing any screws that hold the GPU in place.
Next up is an anti-static wrist strap. It protects both you and your components from static electricity damage during handling.
A flashlight can come in handy too. Good lighting makes it easier to see any screws or connectors that might be difficult to find otherwise.
Have a clean, soft surface on hand where you can safely place your GPU once you’ve removed it. This prevents scratches and other potential damages while you’re working.
With these tools at your side, you’re well-equipped for the job ahead!
Overview of the GPU and Motherboard
The GPU, or Graphics Processing Unit, is the powerhouse behind rendering images and videos on your screen. It works tirelessly to enhance gaming experiences and improve graphic design workflows. A high-performance GPU can significantly elevate visual fidelity.
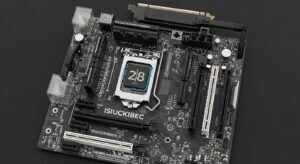
On the other hand, the motherboard acts as the central hub of your computer. It connects all components, including the CPU, RAM, and yes—the GPU itself. Each part communicates through pathways called buses.
Understanding how these two elements interact is crucial for anyone looking to upgrade or troubleshoot their system. The motherboard provides power and data connections that allow the GPU to perform its magic efficiently.
When you consider modifications or repairs, knowing each component’s role helps in making informed decisions. This knowledge ensures compatibility when selecting new hardware or planning maintenance tasks like removing a GPU from a motherboard.
Why You Might Need to Remove a GPU
There are several reasons you might consider removing a GPU from your motherboard.
Upgrading to a more powerful graphics card is one of the most common motivations. As new games and software demand higher performance, an upgrade can breathe new life into your gaming experience.
Another reason could be troubleshooting issues like crashes or artifacts on screen. Sometimes, reseating a GPU may resolve these problems, requiring its temporary removal for inspection.
You might also need to clean dust buildup that can affect performance. Dust accumulation can lead to overheating and reduced lifespan of hardware components.
Furthermore, if you’re switching motherboards or building a new PC altogether, taking out the GPU is essential before making changes.
When selling or repurposing components from an old build, detaching the GPU allows for better resale value and easier transportation.
Precautions to Take Before Removing a GPU
Before diving into the removal process, it’s essential to prepare your workspace. Ensure you have enough room and proper lighting. A tidy environment helps prevent accidental damage.
Next, power down your system completely. Don’t just hit the shutdown button—unplug it from the wall to eliminate any electrical risk. This step is crucial for safeguarding both you and your components.
Consider using an anti-static wrist strap or grounding yourself by touching a metal surface to discharge any static electricity. GPUs are sensitive; even a small static shock can cause irreparable harm.
Make sure you have all necessary tools readily available. This includes screwdrivers that fit your GPU screws, as well as cable ties or organizers if you’re planning on managing cables afterward.
Double-check that you’ve backed up important data before proceeding with hardware changes. It’s always better to be safe than sorry when dealing with technology.
Step-by-Step Guide on Removing a GPU from a Motherboard
Start by powering down your computer and unplugging it from the wall. This is crucial for safety to avoid any electrical mishaps.
Next, remove the side panel of your case. Most panels are secured with screws or thumb latches, making them easy to take off. Lay the case on its side for better access.
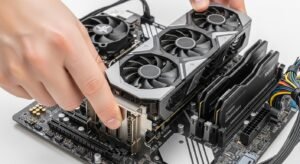
Locate your GPU; it’s usually seated in a PCIe slot near the bottom of the motherboard. Carefully unscrew any brackets that hold it in place.
Once unfastened, gently pull back on the clip at the end of the PCIe slot while simultaneously pulling up on the GPU itself. It should slide out smoothly without excessive force.
Be mindful not to touch sensitive components during this process. Store your removed GPU in an anti-static bag to protect it from damage until you’re ready for reinstallation or storage.
Tips for Reinstalling a GPU
When reinstalling a GPU, start by ensuring your workspace is clean and static-free. Use an anti-static wrist strap if you have one to prevent damage from electrostatic discharge.
Align the Graphics Processing Unit carefully with the PCIe slot on your motherboard. Make sure it fits snugly without forcing it in place. This helps avoid potential connection issues later on.
Secure the Graphics Processing Unit with screws once it’s properly seated. Double-check that all power connectors are firmly attached before closing up your case.
After installation, update your graphics drivers for optimal performance. Keeping them current ensures compatibility and enhances functionality across applications.
Monitor temperatures post-installation to guarantee everything runs smoothly. Regular checks can help catch any problems early on, allowing for a hassle-free experience as you dive back into gaming or graphic-intensive tasks.
Common Mistakes to Avoid When Removing a GPU
One of the most common mistakes is forgetting to power down your computer. Always ensure it’s completely off and unplugged before you start.
Another pitfall? Not discharging static electricity. Touching a grounded metal object can save your Graphics Processing Unit from accidental damage during removal.
Many users also overlook cable management. Make sure all cables connected to the Graphics Processing Unit are disconnected first. This prevents any tugging or pulling that could harm both the card and motherboard.
Rushing through the process can lead to mishaps, like bending pins or breaking components. Take your time and be gentle when handling delicate parts.
Don’t skip checking for screws or latches that secure the Graphics Processing Unit in place. Neglecting this step can result in unnecessary force, which might ruin connections or even break the card itself.
Conclusion
Removing a Graphics Processing Unit from your motherboard can seem daunting, but with the right tools and precautions, it becomes a manageable task. Understanding the importance of this process is crucial for anyone looking to upgrade or troubleshoot their graphics hardware.
Make sure you have all necessary tools at hand before starting. Familiarizing yourself with both the GPU and motherboard layout will ease your journey significantly.
Always consider why you need to remove the Graphics Processing Unit—whether it’s for an upgrade or maintenance—and take proper safety measures. Following a step-by-step guide simplifies the procedure, allowing even beginners to navigate through it confidently.
As you reinstall your Graphics Processing Unit, remember some handy tips that can help ensure everything goes back smoothly. Avoid common mistakes by keeping an eye out for loose connections or misaligned slots during removal and reinstallation.
With these insights in mind, you’ll be well-prepared for any situation involving your Graphics Processing Unit and motherboard relationship.
Whether you’re upgrading performance or troubleshooting issues, knowing how to properly handle your components is key in maintaining an efficient setup.