

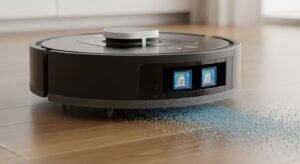
Your Roomba is designed to make cleaning effortless, but if its sensors get dirty, it can lose accuracy and miss spots. You might notice it bumping into walls more or missing corners.
Cleaning your Roomba’s sensors is a simple step that can boost its performance and extend its life. You’ll discover easy, practical tips to keep your Robot sensors spotless so it can work like new every time. Ready to get your robot back on track?
Why Sensor Cleaning Matters
Keeping your Roomba’s sensors clean is key for its proper function. Dirt and dust can block these sensors. This causes the vacuum to miss spots or bump into furniture. Clean sensors help your Roomba navigate well and clean efficiently.
Regular sensor cleaning extends your Robot life. It reduces errors and keeps it running smoothly. Neglecting sensor care leads to poor performance and more maintenance issues. Simple cleaning steps save you time and hassle in the long run.
Impact On Performance
Dirty sensors confuse the Robot navigation system. It may stop suddenly or move in wrong directions. Sensors detect edges and obstacles. Blocked sensors cause collisions or falls down stairs. Cleaning sensors improves cleaning paths and battery use. Your Roomba works faster and cleans better.
Common Sensor Types In Roomba
Roomba uses several sensor types to clean well. Cliff sensors stop it from falling off edges. Dirt detect sensors find dirty spots for extra cleaning. Wall sensors help it follow walls closely. Wheel sensors track movement and distance. Each sensor needs gentle cleaning to stay effective.
Tools Needed For Cleaning
Cleaning your Roomba sensors is important for better performance. Using the right tools makes the process easier and safer. You need items that are gentle and effective. Harsh tools can damage the sensors. Below are the key tools needed for cleaning.
Soft Cloths And Brushes
Soft cloths help remove dust without scratching Robot sensors. Microfiber cloths work best as they trap dirt well. Use a dry or slightly damp cloth for wiping. Brushes with soft bristles clear dirt from small crevices. A clean, soft paintbrush or a small makeup brush is ideal. Avoid hard brushes to prevent sensor damage.
Isopropyl Alcohol And Cleaning Solutions
Isopropyl alcohol cleans grime and grease from Robot sensors effectively. Use a solution with 70% alcohol for safe cleaning. Apply it lightly on a cloth, not directly on sensors. Avoid water or harsh chemicals that may harm sensor parts. Specialized electronic cleaning solutions also work well and are safe.
Preparing Your Roomba
Preparing your Roomba before cleaning its sensors is important. This step ensures safety and helps keep the device in good condition. Proper preparation makes the cleaning process easy and effective.
Powering Off Safely
Turn off your Robot completely. Press the power button and wait until it stops moving and the lights go off. This prevents damage to the device and avoids accidental starts during cleaning.
Unplug the charging dock to avoid any electrical issues. Make sure your hands are dry before handling the Roomba.
Removing Dust And Debris
Check the Robot exterior for dust and dirt. Use a soft cloth or brush to remove loose debris gently. Pay close attention to sensor areas, as dust can block them.
Clean around wheels and brushes too, as dirt buildup here can affect sensor performance. Removing dust first makes sensor cleaning more effective.
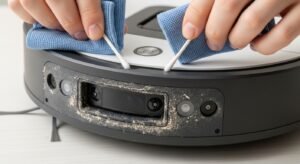
Cleaning Front And Cliff Sensors
Cleaning the front and cliff sensors of your Robot helps it work better. These sensors stop your robot from falling down stairs or bumping into walls. Dirt and dust can block them, making your Roomba less smart. A clean sensor means better cleaning and fewer mistakes.
Locating The Sensors
Find the front sensors near the bottom edge of your Roomba. They look like small, dark windows or holes. Cliff sensors sit under the robot’s body. Check the user manual if you cannot spot them. Knowing their exact place makes cleaning faster and easier.
Wiping And Dusting Techniques
Use a soft, dry cloth to wipe the sensors gently. Avoid using water or sprays that can damage the electronics. A small brush or cotton swab can remove dust from tight spaces. Clean the sensors regularly to keep your Roomba smart and safe. Handle them with care to avoid scratches or damage.
Cleaning Wall Sensors
Cleaning your Roomba’s wall sensors keeps it working well. These sensors help your robot avoid bumping into walls and furniture. Dirt or dust can block the sensors and cause errors in navigation. Regular cleaning ensures your Roomba moves smoothly and cleans efficiently.
Accessing Sensor Areas
First, turn off your Robot and place it on a flat surface. Locate the sensors on the sides and front of the robot. Use a soft, dry cloth or a cotton swab to reach these areas. Gently wipe the sensor lenses to remove dust and grime. Avoid using water or cleaning sprays directly on the sensors. Small tools like a soft brush can help reach tight spots.
Avoiding Damage
Handle the sensors with care to prevent scratches or damage. Do not press hard or use sharp objects. Avoid cleaning the sensors too often; this can wear them out. Keep liquids away from the sensor areas to prevent electrical issues. Always use gentle motions and soft materials when cleaning. Maintaining sensor safety helps your Roomba work longer and better.
Cleaning Other Sensor Types
Cleaning your Roomba’s sensors keeps it working well. Besides the main sensors, other types also need care. These sensors help the Roomba navigate and charge properly. Dirt or dust on them can cause issues. Regular cleaning improves performance and battery life.
Optical And Infrared Sensors
Optical and infrared sensors detect obstacles and drops. Dirt on these sensors can confuse the Roomba. Use a soft, dry cloth to wipe gently. Avoid using water or cleaning sprays. A cotton swab can reach small spaces. Clean these sensors every few weeks for best results.
Charging Contacts
Charging contacts connect the Roomba to its dock. Dust or grime here can stop charging. Use a dry cloth or a pencil eraser to clean the contacts. Gently rub to remove any buildup. Clean the contacts once a month or as needed. This ensures your Roomba charges quickly and fully.
Maintenance Tips For Longevity
Keeping your Roomba sensors clean is key to its long life. Dirt and dust can block sensors. This causes poor performance or errors. Regular care makes your Roomba work well longer.
Simple steps help protect your device. Small efforts prevent big problems. Follow these tips to keep sensors clear and your Roomba running smoothly.
Regular Cleaning Schedule
Set a weekly time to clean sensors. Use a soft, dry cloth or a small brush. Avoid water or harsh cleaners. Gently remove dust and debris from all sensor areas. Check for buildup on bumpers and underneath. Clean sensors more often in dusty homes. This keeps signals clear and navigation accurate.
Storage And Handling
Store your Roomba in a dry, cool place. Avoid spots with direct sunlight or high humidity. Handle the vacuum gently when moving it. Protect sensors from bumps and scratches. Keep it off dirty or wet floors when not in use. Proper storage helps sensors stay intact and functional.
Troubleshooting Sensor Issues
Robot vacuum Roomba sensors help the device navigate your home. Sometimes, these sensors can stop working properly. Troubleshooting sensor issues can keep your Roomba running smoothly. Simple fixes often restore sensor function without much effort.
Common Problems And Fixes
One common problem is dirt blocking the sensors. Clean the sensors gently with a dry microfiber cloth. Avoid using water or cleaning sprays on the sensors. Streaks or smudges can cause errors too. Check for debris or hair tangled around sensor areas. Remove any visible dirt carefully. Restart the Roomba after cleaning to reset the sensors.
Another issue is software glitches. Update your Roomba’s software regularly through the app. Software updates fix bugs affecting sensor performance. If sensors still fail, try resetting the Roomba to factory settings. This can solve many sensor problems quickly.
When To Seek Professional Help
If sensor problems persist after cleaning and resets, seek expert help. Persistent sensor errors may mean hardware damage. Professional technicians can test and repair the sensors. Using unauthorized repairs might void your warranty. Contact Roomba support or an authorized service center. Early professional help saves money and extends your Roomba’s life.
Frequently Asked Questions
How Often Should I Clean Roomba Sensors?
Clean Roomba sensors every 1-2 weeks to maintain optimal performance. Regular cleaning prevents dirt buildup and navigation errors. Frequent sensor maintenance extends your Roomba’s lifespan and improves cleaning efficiency.
What Tools Are Best For Cleaning Roomba Sensors?
Use a soft microfiber cloth or cotton swabs for gentle cleaning. Avoid harsh chemicals or abrasive materials to prevent sensor damage. A small brush can help remove dust from hard-to-reach sensor areas.
Can Water Damage Roomba Sensors During Cleaning?
Yes, water can damage Roomba sensors if used excessively. Use a slightly damp cloth instead of soaking the sensors. Always power off the Roomba before cleaning to avoid electrical issues.
Why Is My Roomba Not Detecting Obstacles Properly?
Dirty or blocked sensors often cause poor obstacle detection. Cleaning the sensors regularly ensures accurate navigation and obstacle avoidance. Check for debris, dust, or smudges that may impair sensor functionality.
Conclusion
Keeping your Roomba sensors clean helps your robot work better. Dirt and dust can block the sensors and cause problems. Regular cleaning makes your Roomba smarter and more efficient. Use a soft cloth or brush for gentle cleaning. Avoid harsh tools or liquids that can damage the sensors.
Small steps like these extend your Roomba’s life and improve its performance. Clean sensors mean a cleaner home with less effort. Simple care keeps your robot vacuum running smoothly every day.