

Are you looking to keep your home safe without the hassle of complicated wiring? Installing wireless home security cameras might be the perfect solution for you.
Imagine having clear, real-time views of your property right from your phone, giving you peace of mind whether you’re at work or on vacation. In this guide, you’ll find simple, step-by-step instructions for setting up your wireless cameras quickly and effectively.
By the end, you’ll feel confident protecting your home with technology that’s both smart and easy to use. Ready to take control of your home security? Let’s get started!
Choosing The Right Wireless Camera

Choosing the right wireless camera is the first step in setting up a home security system. The right camera keeps your home safe and gives clear views. It fits your needs and budget. This section helps you pick the best camera for your home.
Types Of Wireless Cameras
Wireless cameras come in many types. Outdoor cameras are weatherproof and tough. Indoor cameras are smaller and easier to place. Some cameras have a fixed view, while others can move. Look for cameras with night vision for dark areas. Some models include two-way audio to listen and talk. Choose a type that matches your home’s layout and Home Security needs.
Key Features To Consider
Important features matter for security. Check the camera’s resolution for clear images. Higher resolution shows more detail. Motion detection alerts you of movement. Look for cameras with good battery life or plug-in options. Cloud storage is useful for safely storing videos. Also, consider the camera’s app for easy control. Make sure it works on your phone and is simple to use.
Budget And Brand Options
Cameras come in many price ranges. Set a budget that fits your spending plan. Well-known brands often offer better quality and support. Some brands have cheaper models but fewer features. Read reviews to learn about real user experiences. Buying from a trusted brand reduces risks of poor performance. Balance price and features for the best value.
Preparing For Installation
Preparing for the installation of wireless home security cameras is an important step. It ensures the cameras work well and cover the needed areas. Taking time to plan saves effort later. Careful preparation helps avoid common problems. It also makes the setup process faster and easier.
Selecting Camera Locations
Choose spots that cover main entrances and windows. Look for places with a clear view and good lighting. Avoid areas with too much sun glare or shadows. High corners often work best. These spots keep cameras out of reach but still capture wide angles.
Checking Wi-fi Signal Strength
Test the Wi-Fi signal where you plan to install cameras. Weak signals can cause poor video quality or connection drops. Use a phone or laptop to check signal bars at each spot. Move closer to the router if the signal is low. Consider a Wi-Fi extender for distant areas.
Gathering Necessary Tools
Collect all tools before starting the installation. Common tools include a drill, screws, anchors, and a screwdriver. Some Home Security cameras may need a ladder or measuring tape. Having everything ready saves time and avoids interruptions. Read the camera manual to check for any special tools.
Setting Up The Camera Hardware
Setting up the camera hardware is the first step in installing wireless home security cameras. Proper setup ensures the cameras work well and cover the right areas. This process involves mounting the cameras, powering the devices, and adjusting their angles for the best view.
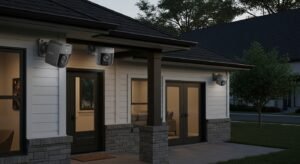
Mounting The Cameras
Choose a spot that covers the area you want to monitor. Use screws or brackets that come with the camera. Fix the camera firmly to avoid shaking. Mount cameras high to avoid tampering. Avoid placing them near bright lights or reflective surfaces.
Powering The Devices
Wireless cameras need batteries or a power outlet. Check the battery type and charge before installation. Some cameras come with rechargeable batteries. If using power outlets, place cameras near sockets. Use weatherproof covers for outdoor power connections.
Adjusting Camera Angles
Point cameras to cover entry points and high-traffic areas. Tilt and swivel the camera to remove blind spots. Test the view on your phone or monitor. Adjust the angle until you get a clear, wide view. Secure the camera after adjusting to keep it steady.
Connecting To The Network
Connecting your wireless home security cameras to the network is the key step. This allows you to view live footage and receive alerts on your devices. The process is simple and does not require advanced technical skills.
Follow clear steps to pair the cameras with your Wi-Fi. Use the mobile app to complete setup and manage settings. If problems arise, troubleshooting tips help restore the connection quickly.
Pairing Cameras With The Wi-fi
Start by turning on your camera and placing it near the router. Press the pairing button on the camera. Open your phone’s Wi-Fi settings and connect to the camera’s network. Return to your camera app and select your home Wi-Fi network. Enter the password carefully. Wait for the camera to confirm the connection. The camera will now send video through your Wi-Fi network.
Using The Mobile App
Download the official app from your app store. Open the app and create an account if needed. Add a new device by selecting the camera model. Follow the on-screen instructions to finish setup. The app lets you view live video and adjust camera settings. You can also set motion alerts and record schedules. The app keeps your camera updated with the latest software.
Troubleshooting Connection Issues
Check the Wi-Fi signal strength near the camera. Move the camera closer to the router if needed. Restart the camera and your router to refresh connections. Make sure the Wi-Fi password is correct. Confirm the app has permission to access your network. Reset the camera to factory settings if it won’t connect. Contact support if problems continue after these steps.
Configuring Camera Settings
Configuring your wireless home security camera settings is key to effective monitoring. Proper settings help reduce false alarms and ensure important events are captured. Adjust each option carefully to match your home’s layout and security needs.
Setting Motion Detection Zones
Motion detection zones let you choose specific areas to watch. This stops alerts from harmless movements like trees or pets. Use your camera’s app to draw zones on the live view. Focus on doors, windows, and driveways for better security.
Adjusting Notification Preferences
Notifications alert you about detected motion or other events. Set how often you want alerts and where they appear, like on your phone or email. Choose quiet hours to avoid disturbances at night. Custom notifications keep you informed without overload.
Enabling Cloud Storage Or Local Backup
Cloud storage saves videos online for easy access and safety. Local backup stores footage on a memory card or hard drive. Decide which option fits your needs and budget. Enable one or both to keep your recordings secure and accessible.
Testing And Maintenance
Testing and maintenance are key to keeping your wireless home security cameras working well. Regular checks help spot problems early. Proper upkeep ensures clear video and reliable alerts. This section explains how to verify coverage, update firmware, clean cameras, and replace batteries for best performance.
Verifying Camera Coverage
Check each camera’s view after installation. Walk around the monitored area. Look for blind spots or weak signal zones. Adjust camera angles to cover important spots. Test night vision in dark conditions. Make sure motion detection works correctly. This step helps catch issues before they affect security.
Regular Firmware Updates
Firmware updates fix bugs and improve features. Check the manufacturer’s app or website often. Download and install the latest version promptly. Updates can enhance camera speed and security. Skipping updates may cause malfunctions or vulnerabilities. Keep your system up to date for smooth operation.
Cleaning And Battery Replacement
Clean camera lenses with a soft cloth regularly. Dust and dirt reduce video quality. Avoid harsh chemicals that damage lenses. For battery-powered cameras, check battery levels monthly. Replace batteries before they run out. Weak batteries cause cameras to stop working. Proper cleaning and battery care keep cameras reliable.
Frequently Asked Questions
How Do I Set Up Wireless Home Security Cameras?
To set up wireless cameras, first choose optimal locations. Mount cameras securely. Connect them to Wi-Fi. Use the app to configure settings and test the video feed. Ensure power supply and strong signal for reliable performance.
What Tools Are Needed To Install Wireless Cameras?
You typically need a drill, screwdriver, screws, and mounting brackets. A ladder may be required for high placements. Most cameras come with installation kits. Always check the manufacturer’s instructions for specific tools and accessories.
How To Connect Wireless Cameras To Wi-fi Network?
Turn on the camera and open its app. Select your Wi-Fi network and enter the password. Follow on-screen prompts to complete the connection. Ensure the camera is within Wi-Fi range for consistent streaming and alerts.
Can Wireless Cameras Work Without Internet?
Yes, wireless cameras can record locally on SD cards. However, internet is needed for remote viewing and cloud storage. Without internet, you won’t receive real-time alerts or access live footage remotely.
Conclusion
Installing wireless home security cameras can protect your home easily. Follow each step carefully for best results. Choose good camera spots for clear views. Keep your system charged or plugged in. Test the cameras to make sure they work well.
Regular checks help keep your home safe. Wireless cameras give you peace of mind day and night. Start securing your home today with simple actions. Safety is always worth the effort.