

Have you noticed tiny spots or smudges on your photos lately? Those annoying marks often come from a dirty camera sensor.
Cleaning your camera sensor might sound tricky, but it’s easier than you think. If you want sharp, clear images without distractions, learning how to clean your camera sensor is a must. You’ll discover simple, safe steps to keep your sensor spotless and your photos flawless.
Ready to take control of your camera’s performance? Let’s dive in.
Why Clean Your Camera Sensor
Cleaning your camera sensor is an important part of camera care. Dust and dirt can build up inside your camera over time. This dirt affects how your photos look. Keeping the sensor clean helps your camera work at its best. It also saves you money on repairs and keeps your images sharp and clear.
Impact Of Dust On Image Quality
Dust on the sensor shows up as dark spots in photos. These spots are more visible on plain areas like the sky or walls. Dust can blur fine details and reduce the overall sharpness. It can make your pictures look less professional. Even small dust particles change the final image. Clean sensors keep your photos crisp and clear.
Signs Your Sensor Needs Cleaning
You might see dark spots or marks on your pictures. These spots stay in the same place in every photo. Blurry or hazy images can also mean sensor dirt. If your camera often asks for sensor cleaning, it may be time. Regularly check your photos for any unusual marks. Catching sensor dirt early keeps your camera in good shape.
Tools Needed For Sensor Cleaning
Cleaning a camera sensor requires the right tools to avoid damage. Using proper tools helps keep the sensor safe and clean. This section explains the main tools you need for sensor cleaning.
Sensor Cleaning Swabs
Sensor cleaning swabs are soft and designed for delicate surfaces. They come in different sizes to fit various sensors. Use these swabs with gentle strokes to remove dust and dirt. Make sure the swabs are clean and dry before use.
Cleaning Solutions
Cleaning solutions help dissolve stubborn spots on the sensor. Choose a solution made especially for camera sensors. Avoid harsh chemicals that can harm the sensor coating. Apply only a small amount on the swab for safe cleaning.
Air Blowers And Brushes
Air blowers remove loose dust without touching the sensor. They use a strong burst of air to clear particles. Brushes are soft and help remove dirt gently. Use these tools before using swabs and solutions to avoid scratches.
Preparing Your Camera For Cleaning
Preparing your camera for sensor cleaning is a crucial step. It helps protect your camera from damage and ensures effective cleaning. Taking the right precautions makes the process safer and easier.
Before starting, gather all necessary tools and find a suitable place. A calm and steady environment reduces the risk of dust settling back on the sensor.
Choosing A Dust-free Environment
Pick a clean room with little air movement. Avoid places with fans, open windows, or strong air flow. Dust particles can quickly land on the sensor while cleaning.
Turn off air conditioners or heaters that blow air. Wipe surfaces to remove dust before you begin. A dust-free space helps keep your sensor clean longer.
Setting Camera To Sensor Cleaning Mode
Most cameras have a special sensor cleaning mode. Activate this mode before cleaning. It locks the mirror up and exposes the sensor safely.
Check your camera’s manual for steps to enable this mode. Keep the camera powered on during cleaning to avoid errors. This setting protects the sensor from damage during the process.
Step-by-step Sensor Cleaning Process
Cleaning your camera sensor is a delicate task. It needs care and the right tools. Follow this step-by-step process to keep your sensor clean and your photos clear. Each step helps remove dust and spots safely.
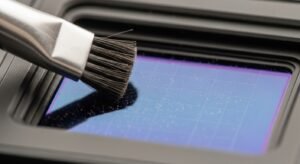
Using An Air Blower
Start with an air blower. It removes loose dust without touching the sensor. Hold your camera facing down. Use short, gentle bursts of air. Avoid canned air as it can damage the sensor. This step clears most dust particles.
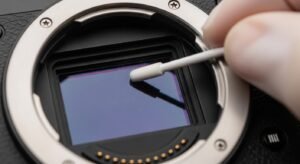
Applying Cleaning Swabs
Next, use sensor cleaning swabs. Choose the right size for your sensor. Apply a few drops of sensor cleaner on the swab. Gently swipe the sensor from one side to the other. Use one side only once. This removes smudges and fine dust.
Dealing With Stubborn Spots
Some spots need more care. Use a fresh swab with a little more cleaner. Swipe slowly and lightly. Avoid pressing hard to protect the sensor. Repeat if needed, but never over-clean. Persistent spots might need professional help.
Precautions To Avoid Damage
Cleaning a camera sensor needs careful steps to avoid damage. Sensors are delicate parts inside your camera. A small mistake can cause expensive repairs. Follow some basic precautions to keep your sensor safe.
Handling The Sensor With Care
Always turn off the camera before cleaning. Avoid touching the sensor with your fingers. Use only tools made for sensor cleaning. Handle the camera gently to prevent shaking. Do not press hard on the sensor surface.
Avoiding Excessive Moisture
Never use too much liquid during cleaning. Moisture can damage sensor electronics quickly. Use a small amount of cleaning solution on a swab. Avoid spraying liquids directly on the sensor. Dry the sensor carefully after cleaning.
When To Seek Professional Help
Do not clean the sensor if you feel unsure. Complex dirt or damage needs expert attention. Professionals have special tools and training. Regular professional cleaning can keep your camera safe. Save money by avoiding risky cleaning attempts.
Maintaining A Clean Sensor
Maintaining a clean camera sensor is essential for clear and sharp photos. Dust and dirt on the sensor can create spots and reduce image quality. Regular care helps keep the sensor free from particles and extends your camera’s life.
Regular Cleaning Schedule
Set a routine to check your sensor every few weeks. Clean it only when you see dust or spots in your photos. Over-cleaning can damage the sensor. Use a blower to remove loose dust before using any wet cleaning tools.
Proper Lens And Camera Body Maintenance
Keep the lens clean to prevent dust from reaching the sensor. Always attach the lens cap when not shooting. Wipe the camera body with a soft cloth to avoid dirt buildup. Store your camera in a clean, dry place to reduce dust exposure.
Frequently Asked Questions
How Often Should I Clean My Camera Sensor?
Cleaning frequency depends on usage and environment. Typically, clean your sensor every 3-6 months. More frequent cleaning is needed in dusty or outdoor settings. Regular sensor checks help maintain image quality and prevent spots or marks on photos.
What Tools Do I Need To Clean A Camera Sensor?
Essential tools include a blower, sensor swabs, and cleaning solution. Use a blower to remove loose dust first. Sensor swabs and cleaning fluid gently remove stubborn dirt. Avoid using household materials to prevent sensor damage.
Can I Clean The Sensor Myself Safely?
Yes, with proper tools and care. Follow manufacturer instructions and work in a clean, dust-free area. Use gentle, precise movements to avoid scratching. If unsure, seek professional cleaning to protect your camera sensor.
What Causes Dust On A Camera Sensor?
Dust enters when changing lenses or in dusty environments. Static electricity also attracts particles to the sensor. Regular sensor cleaning prevents dust accumulation and image defects. Keeping your camera body sealed helps minimize sensor dust.
Conclusion
Cleaning your camera sensor keeps your photos clear and sharp. Use gentle tools and follow safe steps. Avoid rushing to prevent damage. Regular care helps your camera last longer. Keep your gear in good shape for better shots. Small efforts make a big difference in photo quality.
Stay patient and careful during cleaning. Your camera will thank you with great images.