

If you’re creating content for YouTube Shorts, getting the aspect ratio right isn’t just a technical detail—it’s the difference between a professional-looking video that captures attention and one that looks awkward with black bars or awkward cropping.
YouTube Shorts has exploded in popularity, with millions of creators competing for viewers’ attention in those crucial first few seconds. What Aspect Ratio for YouTube Shorts is specifically designed for mobile viewing, and understanding exactly what that means will help you create content that looks polished and maximizes your screen real estate.
Whether you’re filming on your smartphone, editing in professional software, or repurposing content from other platforms, knowing the precise dimensions and best practices will ensure your Shorts stand out in the feed and keep viewers engaged from start to finish.
Understanding What Aspect Ratio Actually Means
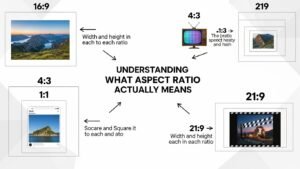
Before diving into the specifics for YouTube Shorts, let’s clarify what aspect ratio actually means. The aspect ratio is the proportional relationship between a video’s width and height, expressed as two numbers separated by a colon.
Traditional television used 4:3, while modern widescreen content uses 16:9. These ratios determine how your video fills the screen and how viewers experience your content. For vertical video platforms like YouTube Shorts, TikTok, and Instagram
Reels, the aspect ratio is flipped to accommodate how people naturally hold their phones. Instead of horizontal rectangles, we’re working with tall, narrow frames that fill a smartphone screen when held upright. This shift in orientation fundamentally changes how you compose shots, frame subjects, and design your content.
The Official Aspect Ratio for YouTube Shorts
YouTube officially recommends a 9:16 aspect ratio for Shorts, which translates to a vertical video format. In pixel dimensions, this typically means 1080 x 1920 pixels, though YouTube accepts various resolutions as long as they maintain that 9:16 ratio.
This is the same aspect ratio used by TikTok and Instagram Reels, making it easier to create content that works across multiple platforms. The 9:16 format is ideal because it perfectly matches how smartphones display content in portrait mode.
When viewers scroll through What Aspect Ratio for YouTube Shorts, your video will fill their entire screen without black bars on the sides or awkward cropping. This immersive viewing experience keeps attention focused on your content rather than being distracted by technical imperfections.
Why 9:16 Matters for Viewer Engagement
The vertical format isn’t just about technical compatibility—it’s about creating an intimate, engaging viewing experience. When your video fills the entire mobile screen, viewers feel more connected to your content. There’s nowhere else to look, no distractions competing for attention.
This full-screen experience is particularly effective for YouTube Shorts aspect ratio optimization because it maximizes the impact of every frame you create. Additionally, YouTube’s algorithm favors content that keeps viewers watching.
Videos with the correct aspect ratio are more likely to be watched to completion because they look professional and provide a seamless viewing experience. Poorly formatted videos with black bars or incorrect cropping signal low production quality, causing viewers to scroll past quickly and hurting your performance metrics.
How to Set Up Your Camera for the Perfect YouTube Shorts Aspect Ratio
Setting up your recording device correctly from the start saves enormous time in editing. Most modern smartphones automatically offer portrait mode recording in their camera apps. Simply hold your phone vertically and start recording—you’re already capturing in the 9:16 format. However, there are some additional settings you should check to ensure optimal quality.
First, verify your resolution settings. Navigate to your camera app’s settings and select the highest quality available, ideally 1080p or 4K. Even though YouTube will compress your video, starting with high-quality footage gives you more flexibility in editing and ensures your final output looks crisp.
Second, enable grid lines if available. Most camera apps offer a grid overlay that helps you compose shots using the rule of thirds. For vertical video, this means positioning your subject slightly off-center vertically, creating more dynamic and interesting compositions than always centering everything in the frame.
Third, consider stabilization options. Vertical videos can emphasize shakiness more than horizontal footage, so enable any built-in stabilization features your phone offers. If you’re shooting on a dedicated camera, use a gimbal or tripod designed for vertical shooting.
Professional Camera Setup for YouTube Shorts
If you’re using a DSLR, mirrorless camera, or professional video equipment, you’ll need to be more intentional about achieving the 9:16 aspect ratio. Most professional cameras record in horizontal formats by default (16:9 or wider), which means you’ll need to either rotate your camera 90 degrees using a specialized mounting plate or plan to crop in post-production.
The rotation method gives you true 9:16 footage but requires specific equipment. L-brackets and cage systems allow you to mount your camera vertically on a tripod while still accessing controls comfortably. This approach is preferred if you’re shooting specifically for Shorts and want maximum resolution in the vertical format.
Alternatively, you can shoot in 4K horizontal (3840 x 2160) and crop to 9:16 in editing, which gives you a final resolution of 1215 x 2160—even higher than the standard 1080 x 1920. This method provides flexibility if you want to also create horizontal versions of your content, but you’ll lose a significant portion of your frame, so plan your compositions accordingly.
Editing Your Video to Match YouTube Shorts Requirements

Once you’ve captured your footage, editing is where you ensure everything aligns perfectly with the aspect ratio for YouTube Shorts. Most modern editing software includes presets for social media formats, making this process straightforward. Popular options like Adobe Premiere Pro, Final Cut Pro, DaVinci Resolve, and even mobile apps like CapCut and InShot all support 9:16 projects.
Step-by-Step Editing Process
Step 1: Create a new project with the correct dimensions. When starting your edit, select a 9:16 aspect ratio or manually enter 1080 x 1920 pixels as your sequence settings. This ensures your entire editing workspace matches the final output format.
Step 2: Import and arrange your clips. Drag your vertical footage into the timeline. If you shot properly in 9:16, your clips should fit perfectly in the frame. If you shot horizontal footage that you’re cropping, position it carefully to ensure the most important elements remain visible.
Step 3: Add text, graphics, and effects within the safe zone. Remember that YouTube’s interface includes elements like the subscribe button, like counter, and channel name that overlay your video. Keep crucial text and graphics away from the bottom 20% and top 10% of the frame to prevent important information from being obscured.
Step 4: Export with optimized settings. Export your video at 1080 x 1920 (or higher) with H.264 codec, which provides the best balance of quality and file size for YouTube. Use a bitrate of at least 8-10 Mbps for 1080p to maintain quality through YouTube’s compression.
Common Mistakes to Avoid with YouTube Shorts Aspect Ratio
Many creators stumble when first producing Shorts, and most issues stem from misunderstanding the What Aspect Ratio for YouTube Shorts. Understanding these pitfalls helps you avoid them from the start. One frequent mistake is repurposing horizontal content without proper consideration for the vertical format.
Simply rotating a landscape video doesn’t work because the composition was designed for a different viewing experience. Faces get cut off, important action happens outside the frame, and the overall effect looks unprofessional.
Another common error involves incorrect export settings. Some creators accidentally export in 16:9 and upload it to YouTube Shorts, resulting in a tiny horizontal video in the center of a vertical frame with large black bars on top and bottom.
This drastically reduces the impact of your content and makes it nearly impossible for viewers to see details or read text. Always double-check your sequence settings before rendering to confirm you’re working in 9:16.
Optimizing Content Specifically for the 9:16 Format
Creating compelling content for the vertical format requires thinking differently about composition and storytelling. The 9:16 aspect ratio naturally draws the eye vertically, which means you should position your subject in the vertical center of the frame rather than following traditional horizontal composition rules. This creates a more balanced look that feels natural on mobile screens.
Text placement becomes crucial in vertical videos. Unlike horizontal formats where you have plenty of width to work with, vertical formats require you to stack text elements vertically. Keep text large and readable, remembering that many viewers watch without sound initially. Captions should be positioned in the upper-middle portion of the frame where they’re easily visible but don’t cover your subject.
Consider the viewing context when planning your shots. Viewers watching Shorts are typically in casual environments—commuting, waiting in line, relaxing at home. Your content should be immediately engaging without requiring close attention to complex details. Bold graphics, clear compositions, and dynamic movement work better than subtle, intricate visuals.
Using Safe Zones and Interface Elements
YouTube Shorts includes interface elements that overlay your video, and understanding where these appear helps you design better content. The interface typically includes a channel icon in the lower left, engagement buttons (like, dislike, comment, share) along the right side, and a description scrolling across the bottom. These elements occupy roughly 15-20% of your total screen space.
To accommodate this, create a “safe zone” in your editing template that marks where interface elements appear. Keep all important visual information—faces, key objects, text overlays, and branding—within the safe zone. This doesn’t mean you can’t use the entire frame for background elements or aesthetics, but anything critical to understanding your content should remain clearly visible despite the interface.
| Element | Recommended Setting |
| Aspect Ratio | 9:16 |
| Resolution | 1080 × 1920 |
| Orientation | Vertical |
| Duration | Up to 60 seconds |
| Text Placement | Center safe zone |
Final Thoughts
Getting the aspect ratio for YouTube Shorts right is fundamental to creating successful vertical content. By shooting or editing in 9:16 format with dimensions of 1080 x 1920 pixels, you ensure your videos display properly on mobile devices and provide viewers with an immersive, professional experience.
Remember to compose your shots with the vertical format in mind, keep important elements within the safe zones to avoid interface overlap, and export with optimized settings for the best quality.
The vertical video revolution isn’t going away—if anything, it’s becoming more dominant as mobile viewership continues to grow. By mastering the technical aspects of the
YouTube Shorts aspect ratio and combining that knowledge with creative storytelling, you position yourself to create compelling content that stands out in an increasingly crowded space. Start experimenting with these techniques today, and watch how proper formatting elevates the professional quality of your Shorts.