

Imagine walking into your room and instantly changing the mood with just a tap on your phone. Setting up Philips Hue smart lights can transform your space, making it brighter, cozier, or even more energizing—whatever you need.
If you’ve ever wondered how to get started but felt overwhelmed by the tech, this guide is made for you. By the end, you’ll have your smart lights up and running smoothly, ready to bring convenience and style to your home.
Choosing The Right Philips Hue Kit

Choosing the right Philips Hue kit is the first step to Smart Lights success. Your choice depends on your home setup and lighting goals. Select the best options to match your needs and space.
Starter Kits Vs. Individual Bulbs
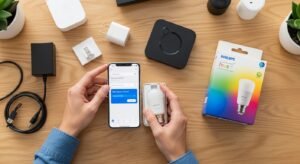
Starter kits include several bulbs and a bridge to control them. They are great for beginners setting up multiple lights at once. Individual bulbs let you add smart lights to existing fixtures. Choose based on how many lights you want to control and your budget.
Compatibility With Your Home Setup
Check if the Philips Hue system works with your home devices. The bridge connects bulbs to your Wi-Fi and mobile app. Some bulbs connect directly via Bluetooth but have limits on range and features. Ensure your Wi-Fi is strong in the rooms where you want smart lights.
Selecting Bulb Types And Colors
Philips Hue offers white, white ambiance, and color Smart Lights . White bulbs provide basic lighting. White ambiance bulbs adjust brightness and color temperature. Color bulbs offer millions of colors for mood lighting. Pick bulb types based on the atmosphere you want in each room.
Preparing For Installation
Preparing for installation is the first step to enjoy Philips Hue smart lights. This stage ensures a smooth setup process. It helps avoid common problems and saves time. Focus on three key areas before you start.
Checking Wi-fi Requirements
Philips Hue lights need a stable Wi-Fi connection. Check your router supports 2.4 GHz frequency. This band covers most smart home devices. Verify your signal reaches all rooms where lights will go. Weak Wi-Fi can cause delays or disconnects. Consider a Wi-Fi extender if needed.
Gathering Necessary Tools
Prepare the tools before unpacking your Smart Lights . Usually, Philips Hue bulbs fit standard sockets, so no special tools are needed. Have a smartphone or tablet ready for the app. A stable internet connection is essential. A ladder or stool might help reach high fixtures safely.
Planning Your Lighting Layout
Decide which rooms and fixtures will get smart lights. Think about how you use each space. Place brighter bulbs in active areas like kitchens and living rooms. Use softer lights in bedrooms and lounges. Sketch a simple map to visualize the setup. This plan makes installation faster and clearer.
Installing Philips Hue Bulbs
Installing Philips Hue bulbs is simple and quick. These smart lights fit into most standard fixtures. They work with your existing lamps and ceiling Smart Lights . The process takes only a few minutes and no special tools.
Follow the steps carefully to ensure your new smart bulbs work perfectly. Proper installation helps you control your lights easily from your phone or voice assistant.
Replacing Existing Bulbs
Start by turning off the power to the light fixture. Remove the old bulb by twisting it counterclockwise. Take your Philips Hue bulb and screw it in clockwise until snug. Avoid overtightening to protect the bulb and socket.
Make sure the bulb fits your fixture type. Philips Hue bulbs come in standard sizes like A19 or GU10. Use the correct bulb for your light fixture for best results.
Using Hue Lights trips And Accessories
Hue Lights trips offer flexible lighting for shelves, under cabinets, and more. Peel off the adhesive backing and stick the strip to a clean surface. Connect the strip to the power source using the included adapter.
Accessories like dimmer switches or motion sensors add convenience. Follow the instruction guide to set up these devices. They extend control options beyond the app or voice commands.
Powering On Your New Lights
Once installed, turn the power back on at the switch or breaker. The Philips Hue bulbs will light up with a soft white glow. This indicates the bulbs are ready to pair with your Hue Bridge or app.
Use the Philips Hue app to find and control your new lights. You can adjust brightness, colors, and set schedules easily. Enjoy your smart lighting experience.
Setting Up The Hue Bridge
Setting up the Hue Bridge is the first step to control your Philips Hue smart lights. The bridge acts as the brain of your system. It connects your lights to your home network and allows you to control them using your phone or voice. Follow these steps carefully to get your Hue Bridge ready.
Connecting To Your Router
Take the Ethernet cable included in the box. Plug one end into the Hue Bridge. Connect the other end to an open port on your router. This connection allows the bridge to communicate with your home Wi-Fi network. Ensure the cable is firmly plugged in both ends.
Powering And Syncing The Bridge
Next, connect the power adapter to the Hue Bridge. Plug it into a wall outlet. The bridge will light up, showing it is powered on. Wait for the lights on the bridge to stop blinking. This means it has synced with your router and is ready to use.
Ensuring Firmware Is Updated
Open the Philips Hue app on your smartphone. The app will detect the bridge automatically. Check for any firmware updates available. Updating ensures your bridge works smoothly with the latest features. Follow the app instructions to complete the update quickly.
Configuring The Philips Hue App
Configuring the Philips Hue app is the key step to control your smart lights easily. The app connects your phone with the Hue Bridge and lights. It lets you turn lights on or off, change colors, and set schedules. Setting up the app is simple and quick. Follow the steps below to get started.
Downloading And Installing The App
First, download the Philips Hue app from the App Store or Google Play. Search for “Philips Hue” and tap the download button. Wait for the app to install on your device. Open the app after installation. Make sure your phone is connected to Wi-Fi for smooth setup.
Creating An Account
Open the app and select “Create Account.” Enter your email address and make a password. The app may ask for your location and permissions. These help with scheduling and voice controls. Verify your email if needed. Signing up lets you save your settings and control lights remotely.
Discovering And Adding Lights
Next, connect your Hue Bridge to power and your router. In the app, tap “Set up” or “Add Lights.” The app will search for your Bridge and connected bulbs. Once found, select your lights to add them. Name each light for easier control. Now, your lights are ready to use through the app.
Customizing Light Settings
Customizing light settings lets you make Philips Hue smart lights fit your mood and space. You can change brightness, colors, and even group lights by rooms. This helps create the perfect atmosphere for any time or activity. The app offers easy controls that anyone can use.
Adjusting Brightness And Colors
Control brightness to match your needs. Dim lights for a cozy feel or brighten them for work. Choose from millions of colors. Pick warm tones for relaxing evenings or cool shades for focus. Changing colors is simple with sliders or presets in the app.
Setting Up Rooms And Zones
Group lights by rooms like living room or bedroom. This lets you control all lights in one place. Create zones within rooms for more control. For example, separate lights on one side of the room. Managing rooms and zones makes lighting faster and more organized.
Creating Lighting Scenes And Routines
Save your favorite light settings as scenes. Quickly switch between scenes for different moods. Set routines to change lights automatically. Wake up with soft light or dim lights at bedtime. Routines help automate daily lighting without any effort.
Integrating With Smart Home Devices
Integrating Philips Hue smart lights with other smart home devices makes your home more connected and convenient. You can control lights using voice commands, smart hubs, or automation rules. This integration helps create a seamless smart home experience.
Connecting To Voice Assistants
Philips Hue works well with popular voice assistants like Amazon Alexa, Google Assistant, and Apple Siri. You just need to link your Hue account to the assistant app. Then, use simple voice commands to turn lights on or off, change colors, or adjust brightness. Voice control adds hands-free convenience to your daily routine.
Linking With Other Smart Hubs
Smart hubs like Samsung SmartThings or Wink can control Philips Hue lights. Connect your Hue bridge to the hub’s app to manage all devices from one place. This lets you combine lights with other smart devices like sensors or cameras. A unified system makes smart home control easier and faster.
Using Automation And Geofencing
Automation lets your Philips Hue lights follow schedules or react to events. Set lights to turn on at sunset or flash when your door opens. Geofencing uses your phone’s location to control lights automatically. Lights can switch on as you arrive home and turn off when you leave. These features save energy and improve home security.
Troubleshooting Common Issues
Setting up Philips Hue smart lights is usually simple, but sometimes issues arise. Troubleshooting helps fix common problems fast. This section guides you through solving usual troubles.
Resolving Connectivity Problems
Connectivity issues occur when bulbs or bridge lose connection. Check if your Wi-Fi is working well. Make sure the Hue bridge is plugged in and connected to the router. Keep bulbs within range of the bridge for strong signals. Restart your router and bridge to refresh connections. Remove and re-add bulbs in the app if they don’t respond.
Resetting Bulbs And Bridge
Resetting can fix bugs and errors. To reset bulbs, turn them on and off six times quickly. Bulbs will blink to show reset. For the Hue bridge, press the small reset button at the back with a pin. Resetting deletes settings, so reconfigure your system after. This step clears errors and helps start fresh.
Dealing With App Errors
App errors can stop you from controlling lights. Close the app fully and reopen it. Check for app updates in your app store. Clear app cache or reinstall if problems persist. Make sure your phone’s Bluetooth and Wi-Fi are on. Log out and log back in to refresh your account connection.
Frequently Asked Questions
How Do I Connect Philips Hue Lights To Wi-fi?
To connect Philips Hue lights, first install the Hue Bridge and connect it to your router. Use the Philips Hue app to discover and pair the lights via Wi-Fi.
What App Do I Need To Control Philips Hue Lights?
You need the official Philips Hue app available on iOS and Android. It lets you set up, customize, and control your smart lights easily.
Can Philips Hue Lights Work Without A Bridge?
Some Philips Hue lights support Bluetooth and can work without a Bridge. However, the Bridge enables full smart features and control for multiple lights.
How To Reset Philips Hue Smart Lights?
To reset, switch the light on and off six times quickly. The light will blink to confirm the reset, then you can re-pair it.
Conclusion
Setting up Philips Hue smart lights is simple and fun. Follow the steps carefully for best results. Connect the bulbs, download the app, and customize your lighting. You can control lights with your phone or voice. Enjoy creating different moods in your home easily.
Smart lighting brings comfort and convenience every day. Start with a few bulbs and add more later. Brighten your space with just a few taps. Smart lights make life easier and more colorful. Give your home a smart upgrade today.