

Your mechanical keyboard is more than just a tool—it’s a key part of your daily routine. But have you ever stopped to think about how much dust, crumbs, and grime build up between those keys?
Cleaning your keyboard might seem like a hassle, but it’s easier than you think. Plus, a clean keyboard not only looks great but feels better to type on and can even last longer. Stick with me, and I’ll show you simple, effective steps to get your mechanical keyboard spotless without damaging it.
Tools And Materials Needed
Cleaning a mechanical keyboard requires certain tools and materials. These help remove dust, dirt, and debris safely. Having the right supplies makes the process easier and more effective. Below are the main tools you need and some extras for deep cleaning.
Essential Cleaning Supplies
- Soft microfiber cloth to wipe surfaces gently
- Compressed air can to blow out dust from between keys
- Keycap puller for removing keycaps without damage
- Isopropyl alcohol (70% or higher) to disinfect and clean
- Cotton swabs for tight spaces and edges
- Small bowl or container to soak keycaps
- Soft brush to remove dirt from keyboard crevices
Optional Accessories For Deep Cleaning
- Ultrasonic cleaner to clean keycaps thoroughly
- Vacuum cleaner with brush attachment for stubborn dust
- Keyboard cleaning gel to pick up fine debris
- Replacement keycaps for worn-out or damaged keys
- Lubricant for mechanical switches to improve key feel
Preparing Your Keyboard
Preparing your mechanical keyboard before cleaning is important. It helps protect the keyboard and makes the process easier. A careful start ensures no damage occurs. Follow simple steps to get ready for cleaning.
Disconnecting And Setting Up
First, unplug the keyboard from your computer or laptop. This stops any accidental key presses. It also keeps the keyboard safe from electrical issues. Place the keyboard on a flat, clean surface. Use a soft cloth or towel underneath to catch dust and small parts. Have a small container ready to hold the keycaps. This helps keep them organized and prevents loss.
Removing Keycaps Safely
Use a keycap puller tool for easy removal. If you do not have one, use your fingers gently. Avoid pulling the keycaps too hard to prevent damage. Remove keys one by one, starting from the edges. Place each keycap in the container carefully. Keep track of key locations for easy reassembly. Cleaning under the keycaps is easier after removal. Take your time to avoid breaking any parts.
Surface Cleaning Techniques

Keeping your mechanical keyboard clean improves its look and performance. Surface cleaning helps remove dust, dirt, and oils on the keys and case. This step is simple but important for daily maintenance. It keeps your keyboard fresh and comfortable to use.
Dusting And Wiping
Start with dusting to clear loose particles. Use a soft brush or a microfiber cloth. Gently sweep over all keys and the keyboard surface. Avoid pressing hard to prevent damage.
Next, wipe the surface with a damp cloth. Use water or a mild cleaning spray made for electronics. Lightly moisten the cloth, never soak it. Wipe keys and the keyboard frame to remove oils and grime.
Do not use harsh chemicals or too much liquid. This can harm the keyboard’s finish and electronics inside. Dry the surface with a clean, dry cloth after wiping.
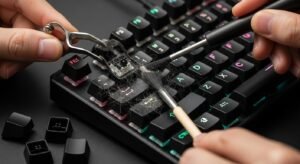
Cleaning Between Keys
Dirt often hides between the keys. Use a soft brush or a cotton swab to clean these tight spaces. Move the brush gently between the keys to remove dust and debris.
Compressed air is also effective. Hold the can upright and blow air between the keys. This removes crumbs and small particles.
For deeper cleaning, remove the keycaps carefully. Clean underneath with a cloth or brush. Make sure all parts are dry before reassembling the keyboard.
Deep Cleaning Methods
Deep cleaning your mechanical keyboard helps keep it in top shape. Dust, dirt, and oils can build up under the keys. Regular cleaning stops this buildup and improves typing feel. This section covers three key deep cleaning methods to refresh your keyboard.
Soaking Keycaps
Remove the keycaps carefully using a keycap puller. Place them in a bowl with warm water and mild soap. Let the keycaps soak for 30 minutes. Use a soft brush to scrub away dirt. Rinse the keycaps with clean water. Dry them completely on a towel before reinstalling.
Cleaning Keyboard Base
Turn off and unplug your keyboard. Use a soft brush or cloth to remove loose dust. Dampen a cloth with isopropyl alcohol and wipe the keyboard base gently. Avoid excess moisture to protect electronics. Use cotton swabs to clean small or tight areas. Let the keyboard dry fully before use.
Using Compressed Air
Hold the keyboard at an angle to let debris fall out. Use short bursts of compressed air between the keys. Keep the can upright to avoid spraying liquid. This method removes dust in hard-to-reach spots. Repeat as needed to clear stubborn dirt.
Drying And Reassembling
After cleaning your mechanical keyboard, drying and reassembling are key steps. Proper drying ensures no moisture harms the electronics. Careful reassembly brings your keyboard back to full function. Taking time here prevents damage and keeps your keyboard working well.
Proper Drying Tips
Dry the keyboard parts completely before reassembly. Use a soft cloth to wipe off water from keycaps and base. Let them air dry in a warm, dry place. Avoid direct sunlight or heat sources that may warp plastic. Leave parts to dry for at least 24 hours. Check that no moisture remains in crevices or under switches. Patience here protects your keyboard from short circuits and rust.
Reattaching Keycaps
Match each keycap with its correct switch location. Press each keycap gently but firmly onto the switch stem. Make sure keycaps snap into place without forcing. Start with larger keys like spacebar and enter to keep stability. Test keys for proper movement after attaching. Fix any loose or stuck keycaps before finishing. Correct reassembly ensures smooth typing and a neat keyboard look.
Maintaining Cleanliness
Keeping your mechanical keyboard clean helps it work well and last longer. Dust, dirt, and crumbs can build up between the keys. This buildup can cause keys to stick or stop working. Regular cleaning prevents these problems and keeps your keyboard looking nice.
Maintaining cleanliness is simple with a routine and some small habits. A clean keyboard feels better to type on. It also keeps germs away and improves your workspace hygiene.
Regular Cleaning Schedule
Set a time to clean your keyboard every week or two. Use a soft brush or compressed air to remove dust. Wipe the surface with a damp cloth to clear dirt. Do a deep clean once a month by removing keycaps carefully. Clean each keycap with mild soap and water.
Preventive Care Tips
Avoid eating or drinking near your keyboard to stop spills and crumbs. Wash your hands before typing to reduce oil and dirt. Use a keyboard cover to protect from dust. Store your keyboard in a clean place when not in use. These small steps keep your keyboard clean longer and save time on cleaning.
Frequently Asked Questions
How Often Should I Clean My Mechanical Keyboard?
You should clean your mechanical keyboard every 1 to 3 months. Frequent use and dust exposure determine the cleaning frequency. Regular cleaning prevents key sticking and maintains performance.
What Tools Do I Need To Clean A Mechanical Keyboard?
Basic tools include a keycap puller, soft brush, microfiber cloth, and compressed air. For deep cleaning, use isopropyl alcohol and cotton swabs to remove grime effectively.
Can I Remove Keycaps For Cleaning Safely?
Yes, removing keycaps is safe with a keycap puller. It helps clean underneath keys thoroughly. Be gentle to avoid damaging the switches or keycaps.
Is It Okay To Use Water On Mechanical Keyboards?
Avoid soaking the Mechanical Keyboard in water. Use damp cloths or isopropyl alcohol for cleaning keycaps and surfaces. Ensure the keyboard is unplugged and dry before use.
Conclusion
Cleaning your mechanical keyboard keeps it working well and looking neat. Regular care stops dust and grime from building up. Use simple tools like brushes and cloths for best results. Take your time and be gentle with each key. A clean keyboard feels better to type on and lasts longer.
Keep this routine often to enjoy a fresh keyboard every day. Easy steps make a big difference in keyboard care. Give your keyboard the attention it needs, and it will repay you.