

Is your laptop getting too hot and slowing you down? You’re not alone.
Overheating can cause your device to lag, crash, or even get damaged. But what if you could fix this problem quickly and affordably? Making your own laptop cooling pad is easier than you think. In this guide, you’ll discover simple steps to build a cooling pad that keeps your laptop cool and boosts its performance.
Benefits Of A Cooling Pad
A cooling pad helps keep your laptop cool during use. It stops the laptop from getting too hot. This tool is simple but very useful. Many people do not realize how much a cooling pad can help their laptop work better and last longer.
Preventing Overheating
Overheating can cause your laptop to slow down or shut off. A cooling pad moves air around your laptop. This lowers the temperature inside the laptop. Cooler laptops run smoothly and avoid damage from heat.
Enhancing Performance
Heat makes your laptop work slower. Cooling pads help keep the laptop’s parts cold. This means the laptop can run faster and better. You will see fewer delays and freezes during use.
Extending Laptop Lifespan
High heat can damage the laptop’s components over time. Cooling pads protect these parts from heat stress. This protection helps your laptop last longer. You save money by not needing repairs or new laptops soon.
Materials Needed
Creating a laptop cooling pad is simple. The right materials make a big difference. Gather all necessary parts before starting. This helps keep the project smooth and easy.
Each material plays a key role. Cooling fans move air to keep your laptop cool. A power source keeps the fans running. The base platform holds everything together. Extra tools help with assembly and finishing.
Cooling Fans
Choose small, quiet fans. USB-powered fans are popular and easy to use. Look for fans with good airflow. Two or three fans work well for most laptops. Make sure fans fit the size of your base platform.
Power Source Options
USB ports are the easiest power source. You can plug the fans directly into your laptop. Portable power banks work if you want mobility. Some prefer using an AC adapter for continuous power. Choose a power source that fits your needs.
Base Platform Choices
Wood, plastic, or metal can be used. Wood is easy to work with and sturdy. Plastic is lightweight but less durable. Metal offers strong support and good heat conduction. Pick a material that suits your skill and tools.
Additional Tools
You need a screwdriver for fan installation. Hot glue or double-sided tape helps secure parts. A drill or knife may be needed to make holes. Sandpaper smooths rough edges on the base. Simple tools make assembly faster and cleaner.
Choosing The Right Fans

Choosing the right fans is key to making an effective laptop cooling pad. Fans control airflow, heat removal, and overall cooling performance. Picking the right size, speed, noise, and power use affects your laptop’s temperature and comfort. Let’s explore what matters most.
Fan Size And Speed
Bigger fans move more air with less effort. They cool better and stay quieter. Smaller fans spin faster but make more noise. Choose fans that fit your pad’s design and your laptop’s size. A speed between 1000 and 2000 RPM works well for cooling without excess noise.
Noise Levels
Low noise means a better working or gaming experience. Fans with ball bearings often run quieter and last longer. Look for fans rated below 30 decibels for quiet operation. Avoid cheap fans that can be loud and distracting during use.
Power Consumption
Fans use power from your laptop’s USB port. Choose fans with low power draw to avoid draining your battery fast. Most USB fans use between 0.5 to 1.5 watts. Efficient fans keep your laptop cool without wasting energy.
Building The Base
Building the base is the first step to create a strong laptop cooling pad. The base holds everything together. It supports the fans and the laptop. Choosing the right materials and design helps keep your laptop cool and stable.
Selecting The Surface Material
Pick a material that can handle heat well. Plastic is light but may trap heat. Metal, like aluminum, spreads heat quickly. Wood feels sturdy but might block airflow. Choose a surface that stays cool and supports your laptop safely.
Designing For Airflow
Create spaces for air to move freely. Cut holes or slots in the base. Place fans where air can flow under the laptop. Avoid blocking vents on your laptop. Good airflow stops heat from building up.
Ensuring Stability
Make sure the base stays steady on your desk. Add rubber feet or grips to stop slipping. Check the size fits your laptop well. A stable base keeps the cooling pad working and protects your laptop from falls.
Wiring And Power Setup
Setting up the wiring and power for your laptop cooling pad is a key step. Proper wiring ensures the fans run smoothly. Power setup decides how you supply electricity to the fans. Both affect the cooling pad’s performance and safety.
Connecting Fans In Parallel Or Series
Fans can connect in two ways: parallel or series. Parallel wiring means each fan connects directly to the power source. This keeps the same voltage for all fans. If one fan stops, others keep working.
Series wiring connects fans one after another. The voltage splits between fans. If one fan fails, all fans stop working. Parallel wiring is better for laptop cooling pads. It gives stable power and keeps fans running even if one breaks.
Powering Via Usb Or Battery
You can power your cooling pad using USB or battery. USB power is simple and common. Most laptops have USB ports. USB provides 5 volts, enough for small fans.
Batteries offer portability. You can use rechargeable batteries or power banks. Batteries let you use the cooling pad anywhere. Choose a battery that matches the fan voltage and current needs.
Safety Precautions
Safety is very important in wiring and power setup. Use insulated wires to avoid electric shocks. Check all connections are tight and secure. Loose wires can cause short circuits.
Avoid overloading the power source. Use a fuse or circuit breaker if possible. Keep the cooling pad dry and away from liquids. These steps prevent accidents and protect your laptop and yourself.
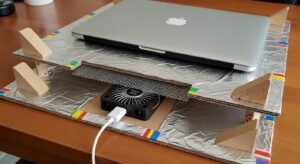
Assembling The Cooling Pad
Assembling the cooling pad is the step where your parts come together. You will see your project take shape. Careful assembly ensures your laptop stays cool and runs smoothly.
Mounting The Fans
First, place the fans on the base of your cooling pad. Use screws or strong glue to fix them firmly. Make sure the fans face the right way to push air upward. Avoid blocking the fan blades with wires or other parts.
Securing Wiring
Next, organize the wires connecting the fans to the power source. Use small clips or tape to hold the wires neatly along the pad’s edges. Keep the wires tight to stop them from moving or catching on anything. Check all connections to ensure good contact and safety.
Final Adjustments
Finally, test the fans by connecting the power. Listen for smooth, quiet running. Adjust the fan positions if airflow feels weak. Tighten all screws once everything works well. Your cooling pad is ready to help your laptop stay cool.
Testing And Maintenance
Testing and maintenance are key to keeping your laptop cooling pad working well. Regular checks ensure the pad cools effectively. Maintenance stops dust and dirt from building up. This helps the fans run smoothly and the laptop stay cool.
Checking Cooling Efficiency
Test the cooling pad by feeling the airflow. Place your hand near the fans to sense air movement. Check if your laptop feels cooler after using the pad. Use a temperature app to monitor your laptop’s heat. If the temperature stays high, the pad may need fixing.
Cleaning Tips
Turn off and unplug the cooling pad before cleaning. Use a soft brush or cloth to remove dust from fans. Clean the air vents gently to avoid damage. Avoid using water directly on the pad. Regular cleaning prevents dust from blocking airflow.
Troubleshooting Common Issues
If the fans do not spin, check the power connection. Try plugging the pad into a different USB port. Listen for unusual noises that may show fan problems. Replace fans if they are noisy or stop working. Keep the pad on a flat surface for best performance.
Customizing Your Cooling Pad
Customizing your laptop cooling pad can improve its function and style. You can tailor it to fit your needs and preferences. Small changes make a big difference in comfort and cooling power. Here are some ideas to enhance your cooling pad.
Adding Led Lights
LED lights add a cool visual effect to your cooling pad. They create a nice glow around your laptop. Choose colors that match your style or mood. Use simple LED strips or small bulbs powered by USB. Make sure wiring is neat and safe to avoid damage.
Adjustable Fan Speed
Adjustable fan speed helps control cooling and noise levels. You can make the fan spin faster for more cooling or slower for quiet use. Use a small switch or a rotary controller to change speed easily. This feature saves power and extends fan life.
Portable Design Ideas
Make your cooling pad easy to carry and use anywhere. Use lightweight materials like plastic or thin metal sheets. Add foldable legs or hinges for compact storage. Include a handle or strap for easy transport. A portable design means you stay cool on the go.
Frequently Asked Questions
What Materials Are Best For A DIY Laptop Cooling Pad?
Use lightweight, heat-resistant materials like aluminum or acrylic. These conduct heat well and improve airflow, keeping your laptop cooler. Avoid materials that trap heat or block vents to ensure effective cooling.
How Do I Power A Homemade Laptop Cooling Pad?
Most DIY cooling pads use USB-powered fans. Connect fans to your laptop’s USB port or an external power bank for portability and convenience. This setup provides sufficient power without extra cables or adapters.
Can A DIY Cooling Pad Improve Laptop Performance?
Yes, cooling pads reduce laptop heat, preventing thermal throttling. Cooler temperatures keep your CPU and GPU running efficiently, enhancing performance and prolonging hardware life during intensive tasks.
How Many Fans Should A Laptop Cooling Pad Have?
Two to three fans typically provide optimal airflow for most laptops. This setup balances noise and cooling efficiency, ensuring your laptop stays cool without excessive sound disruption.
Conclusion
Making a laptop cooling pad is simple and saves money. You can use common materials found at home. It helps keep your laptop cool and running well. Cooler laptops work faster and last longer. Try building your own cooling pad today.
Enjoy a quieter and cooler laptop experience. Small steps make a big difference. Keep your device safe and comfortable. Now, you know how to make a practical cooling pad.