

If you see white, chalky residue on the inside of your electric kettle, or if your morning tea tastes just a little off, you’ve got limescale buildup. Knowing how to descale an electric kettle fast is not only about visuals; it is also crucial for helping your appliance work better, last longer, and allow your drinks to taste AMAZING.
The good news? Descaling doesn’t have to involve expensive commercial products or hours of scrubbing. Just a few household ingredients (white vinegar, lemon juice or baking soda) and about 30 minutes are all you need to get your kettle back in sparkling shape.
This thorough guide to descaling shows you several tested methods, why limescale is forming and provides advice on how to prevent it in the future from a pro. Though you may have light build-up on the shower walls or hard mineral deposits, there’s a solution that will be right for your problem.
Understanding Limescale: What’s Really Happening Inside Your Kettle
Before diving into descaling methods, it’s worth understanding what you’re actually fighting against. Limescale is a hard, off-white chalky deposit composed primarily of calcium carbonate. It forms when hard water—water with high mineral content—is heated. As the water temperature rises, calcium and magnesium minerals separate from the water and crystallize on your kettle’s heating element and interior surfaces.
The severity of limescale buildup depends largely on where you live. If you’re in an area with hard water, you might notice significant deposits forming within just a few weeks of regular use. In contrast, those with soft water may go months before seeing any noticeable buildup. Regardless of your water hardness level, descaling should become part of your regular kitchen maintenance routine.
Neglecting this task reduces your kettle’s heating efficiency, forcing it to work harder and consume more energy. Eventually, excessive buildup can damage the heating element entirely, shortening your kettle’s lifespan considerably.
The Classic Vinegar Method: Fast and Foolproof
What You’ll Need
- White distilled vinegar (1-2 cups)
- Water
- Soft cloth or sponge
- Optional: small brush for stubborn spots
Step-by-Step Instructions
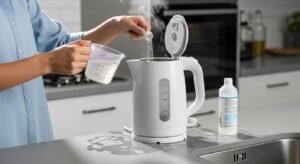
Step 1: Prepare the vinegar solution. Mix equal parts white vinegar and water. For most standard kettles, one cup of each works perfectly. If you’re dealing with heavy buildup, increase the vinegar ratio to two parts vinegar to one part water.
Step 2: Fill and boil. Pour the solution into your kettle, ensuring it covers all affected areas, especially the heating element. Switch on the kettle and bring the mixture to a full boil. The boiling process helps the acetic acid in vinegar break down mineral deposits effectively.
Step 3: Let it sit. Once boiled, turn off the kettle and let the solution sit for 15-20 minutes. For severe limescale, you can extend this to 30 minutes or even an hour. During this time, the acid continues working to dissolve stubborn deposits.
Step 4: Discard and scrub. Pour out the vinegar solution. If you notice remaining flakes, gently scrub with a soft cloth or non-abrasive sponge. Avoid metal scrubbers, which can scratch the interior surface.
Step 5: Rinse thoroughly. Fill the kettle with fresh water, boil it, and discard. Repeat this rinsing process 2-3 times until the vinegar smell completely disappears. This step is crucial—nobody wants vinegar-flavored coffee!
The Natural Lemon Juice Alternative
For those who find vinegar’s smell overwhelming, lemon juice offers an equally effective and more pleasant-smelling alternative. The citric acid in lemons works similarly to vinegar’s acetic acid, breaking down calcium carbonate deposits while leaving behind a fresh, clean scent. This method is particularly popular among people who prefer natural cleaning solutions and want their kitchen to smell citrusy rather than pickled.
To use this method, squeeze the juice from one or two fresh lemons into your kettle, then fill it with water. Bring the mixture to a boil and let it stand for an hour. The extended soaking time compensates for citric acid being slightly less concentrated than vinegar. After soaking, pour out the solution and wipe away loosened deposits.
You’ll find that not only has the limescale disappeared, but your kettle also smells wonderfully fresh. Some people add lemon slices to the water for extra descaling power and an even stronger citrus aroma. Rinse thoroughly with two to three cycles of fresh boiled water before using your kettle for beverages.
Commercial Descaling Solutions: When to Invest
Tried and tested home remedies are great for regular maintenance, but in some circumstances commercial descaling products can not be ignored. These purpose-made solutions are formulated with the perfect acid content to remove scale. They are especially useful if you have really hard water, haven’t descaled in months you have some tough junk that vinegars can even budge.
The majority of commercial descales are available as a clear liquid or powder, and the packages have straightforward instructions printed right on them. The usual procedure is to dilute the descale in water, as per the instructions then boil and allow to act for a certain number of times. Some superior products perform their work without boiling, and are based around even stronger chemical formulations which can dissolve limescale at normal temperature.
Its primary pros are that it acts more quickly; is less smelly than vinegar and some formulations won’t discolor kettle materials. But, of course, they are also more expensive than vinegar or lemon juice and can have chemicals you’d rather avoid in appliances designed to prepare water for food and drink.
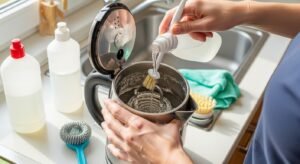
The Baking Soda Boost: Tackling Stubborn Deposits
The Method
When vinegar alone isn’t quite cutting it, adding baking soda creates a powerful descaling combination. Mix one tablespoon of baking soda with water in your kettle, then add half a cup of vinegar. The mixture will fizz vigorously—this chemical reaction helps lift stubborn deposits.
Boil this solution, let it sit for 20 minutes, then pour it out. You’ll likely notice more limescale coming away than with vinegar alone. The gentle abrasive quality of baking soda, combined with vinegar’s acidity, provides extra cleaning power without scratching your kettle’s surface.
For extremely stubborn deposits, make a paste with baking soda and a small amount of water. Apply this directly to problem areas, let it sit for 10 minutes, then scrub gently with a soft cloth before proceeding with the regular vinegar descaling process.
How Often Should You Descale Your Electric Kettle?
The frequency of descaling depends on several factors: water hardness, usage frequency, and kettle capacity. As a general guideline, if you live in a hard water area and use your kettle daily, descale once a month. For moderate water hardness with regular use, every two to three months suffices. Those fortunate enough to have soft water can extend this to every four to six months.
Visual inspection provides the best indicator. Check your kettle weekly for white deposits forming on the heating element or interior walls. If you notice even minor buildup beginning, it’s time to descale. Don’t wait until deposits become thick and crusty—early intervention makes the process much faster and easier.
Additionally, pay attention to performance changes. If your kettle takes noticeably longer to boil, makes unusual noises, or leaves white flakes in your drinks, these are clear signals that descaling is overdue.
Prevention Tips: Keeping Your Kettle Cleaner Longer
Use Filtered Water
Installing a simple water filter or using filtered water in your kettle dramatically reduces mineral buildup. While this requires a small investment in a filter pitcher or faucet attachment, you’ll descale far less frequently and extend your kettle’s lifespan.
Empty After Each Use
Don’t leave water sitting in your kettle between uses. Stagnant water allows minerals to settle and adhere to surfaces. After each use, pour out any remaining water and leave the lid open to air dry.
Wipe Regularly
Once or twice weekly, wipe your kettle’s interior with a damp cloth. This simple habit removes mineral deposits before they can harden and become problematic.
Consider a Kettle Protector
Some people place a marble or stainless steel ball in their kettle. As the water boils, the object moves around, helping prevent limescale from adhering to surfaces. This old-fashioned trick actually works, though it creates extra noise during boiling.
Safety Considerations When Descaling
Do not ever put and harsh chemicals such as bleach or abrasive cleaners down your kettle. These can corrode the inside, pollute future water and in worst case scenarios cause harmful chemical reactions. Stick to food-safe acids like vinegar, lemon juice or approved commercial descales.
Be sure to unplug your kettle before wiping or manual scrubbing the outside and/or bottom of the inside. Do not submerge the kettle base, power cord or plug in water; to clean these you should wipe with a damp cloth.
After descaling, make sure you do several rinses. Residual descaling solution, including natural vinegar, can be harmful if consumed and adversely affect the taste of your coffee/tea.
If you observe that the heating element or the internal coating are damaged during descaling, do not use and contact the manufacturer. Perhaps they are not limescale but something else that’s deteriorating and needs professional help.
Troubleshooting Common Descaling Challenges
Problem: Vinegar smell won’t disappear. Solution: Boil fresh water with a tablespoon of baking soda, which neutralizes acidic odors. Repeat rinsing cycles until the smell vanishes completely.
Problem: Black or colored deposits instead of white. Solution: This might be rust or other contamination rather than limescale. Try the baking soda paste method, but if discoloration persists, contact the manufacturer about potential material degradation.
Problem: Flakes keep appearing in drinks after descaling. Solution: You likely haven’t rinsed thoroughly enough. Perform 4-5 additional boil-and-rinse cycles with fresh water.
Problem: Descaling solution doesn’t seem to work. Solution: Your deposits might be extremely old and thick. Try extending soaking time to several hours or overnight, or use a stronger commercial descale formulated for heavy buildup.
Conclusion: Clean Kettle, Better Beverages
Knowing how to descale an electric kettle quickly empowers you to maintain one of your kitchen’s hardest-working appliances with minimal effort. Whether you choose the classic vinegar method, prefer the fresh scent of lemon juice, or opt for commercial solutions, regular descaling takes just 30 minutes and delivers immediate benefits.
Your kettle will heat faster, operate more efficiently, last longer, and most importantly, produce better-tasting tea, coffee, and other hot beverages.
Make descaling part of your monthly kitchen routine—your future self will thank you when you’re enjoying perfectly clean, fresh-tasting hot drinks from a sparkling kettle. Set a recurring reminder on your phone, mark it on your calendar, or simply check your kettle every few weeks. The small investment of time prevents major headaches down the line and ensures your morning routine stays smooth and efficient.