

Recording clean audio with your DJI Osmo Pocket 3 has never been easier, thanks to the wireless Microphone system from DJI Mic 2. Whether as a vlog creator, filmmaker, videographer / iPhone content creator with a need for rich, clear audio, or couples the mic with an iPhone to capture sound directly in front of the camera — just plug it in and point! Open Wireless Mic on the Pocket 3, enter Linking Mode, turn on the Mic 2, hold the link button until it pairs, and wait for “Connected.”
In this all-encompassing guide, I’ll take you through every step needed to successfully pair these two devices together, from setting them up initially to dealing with common connection issues, so you can concentrate on producing engaging content rather than flapping around trying to make a connection.
How DJI Mic 2 Works with Osmo Pocket 3
But before we get into how to connect DJI Mic 2 to Osmo Pocket 3, let’s take a look at what makes the DJI Mic 2 and Osmo Pocket 3 such a well-paired combination in the first place. The DJI Mic 2 adds a better sound, longer battery life, and more connectivity options when compared to its predecessor.
The Osmo Pocket 3, on the other hand, is DJI’s first-ever pocket-sized gimbal camera to feature professional-quality audio input accoutrements directly made for use with DJI’s network of accessories.
There are several ways of connecting these devices, and they are appropriate under different recording conditions. The easiest method is by using the DJI Mic 2 receiver unit,t which can be plugged directly into the Osmo Pocket 3’s USB-C port.
On the other hand, you can use Bluetooth if you want to go completely wireless, with a slight delay possible depending on your recording space.
What You’ll Need Before Getting Started
Embelton says that being prepared is the key to ensuring a seamless connecting process and helps avoid frustrating hiccups during your shoot. First, ensure that your DJI Mic 2 system is charged up (both transmitter and receiver).
The Osmo Pocket 3 itself should have a good battery % remaining, ideally over 50,% to avoid potential power-related disconnections. Second, you’ll want the right connection cable (usually included with your DJI Mic 2 package) that will facilitate linking the receiver to USB-C on Osmo Pocket 3.
Also, make sure that both have the most up-to-date firmware. DJI continuously releases updates to enhance connectivity stability and fix existing bugs.DJI also added some new features.
You can run a firmware update via the DJI Mimo app on your smartphone, which acts as the control interface for your Osmo Pocket 3. If you’ve already got everything in sync before trying to pairthe DJI Mic 2 with the Osmo Pocket 3, you’ll reduce the risk of compatibility issues and have access to the most polished software for each of your devices.
Connecting DJI Mic 2 to Osmo Pocket 3 via USB-C
Step 1: Power on Your Devices
Begin by turning on both your DJI Mic 2 receiver and your Osmo Pocket 3. Press and hold the power button on the receiver until you see the LED indicator light up. Similarly, power on your Osmo Pocket 3 by pressing its power button. Wait for both devices to complete their startup sequences, which typically takes just a few seconds.
Step 2: Prepare the Transmitter
Power on the DJI Mic 2 transmitter by pressing its power button. The transmitter should automatically pair with the receiver if they’ve been paired previously. You’ll know the connection is successful when the receiver’s display shows the transmitter is linked, typically indicated by a wireless icon and signal strength indicator.
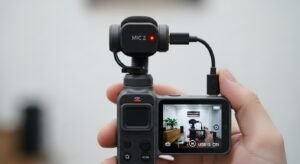
Step 3: Connect the Receiver to Osmo Pocket 3
Take the USB-C cable that came with your DJI Mic 2 and connect one end to the receiver’s output port. Then, carefully insert the other end into the USB-C port on your Osmo Pocket 3. The port is located on the bottom section of the device, easily accessible even when the camera is mounted on a tripod or held in your hand.
Step 4: Configure Audio Settings
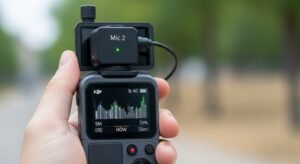
Once connected, swipe down on the Osmo Pocket 3’s touchscreen to access the quick settings menu. Navigate to the audio settings section, where you should see the DJI Mic 2 listed as an available audio input source. Tap to select it as your primary audio input, replacing the built-in microphones.
Step 5: Test Your Audio Levels
Before starting your actual recording, perform a quick sound check. Speak into the DJI Mic 2 transmitter while watching the audio level meters on your Osmo Pocket 3’s screen. The levels should respond to your voice, moving up and down with your speech volume. Adjust the input gain if necessary to prevent distortion or overly quiet recordings.
Wireless Bluetooth Connection Method
Although the wired USB-C connection delivers zero-latency audio and our best-in-class sound quality, you can also Bluetooth Pair with your Nintendo Switch, Windows PC, Mac, or even devices that lack a 3.5 millimeter jack, like your smartphone.
This works wonderfully in situations where you need the maximum mobility, as well as when shooting in compact areas, as cables may be an issue. That’s where some Bluetooth connectivity comes in-the DJI Mic 2 features a wireless connection to your Osmo Pocket 3 (technically speaking, itself, but y’know). Notethat thet recording may experience a slight delay in the microphone sound depending on the environment.
To connect via Bluetooth, first enable Bluetooth in the settings menu on both devices. Open the system menu on the Osmo Pocket 3 to track down it’s bluetooth settings and set it discoverable.
On your DJI Mavic 2 receiver, go to Bluetooth pairing and search for devices. When the list of discoverable devices pops up, and you see Osmo Pocket 3, click on it to start pairing.
Usually, you will have to confirm the connection on both devices by accepting a pairing request. After its initial pairing, the devices will always recognize each other, making using them again in the future a breeze.
Optimizing Audio Quality for Different Recording Scenarios
The beauty of learning how to connect DJI Mic 2 to Osmo Pocket 3 extends beyond simply establishing a physical or wireless link. Understanding how to optimize your audio settings for different environments dramatically improves your final output quality.
When recording in quiet indoor environments, you can afford to use lower gain settings, which reduces the chance of picking up unwanted background noise or electrical interference. For outdoor recordings, especially in windy conditions, increase the gain slightly while using the included windscreen on your transmitter to minimize wind noise without sacrificing vocal clarity.
Consider the distance between your subject and the transmitter as well. The DJI Mic 2 performs exceptionally well at various distances, but optimal placement typically means clipping the transmitter to your subject’s collar, approximately six to eight inches from their mouth.
This positioning captures clear, direct vocal sound while minimizing ambient noise pickup. For interview situations, you might want to enable the safety track feature if your Mic 2 supports it, which records a secondary audio track at lower levels as insurance against unexpected audio peaks that could cause distortion.
Indoor Recording Settings
For controlled indoor environments like studios or quiet rooms, set your input gain around 50-60% to start. Monitor your audio levels carefully and adjust based on your subject’s speaking volume.
Indoor spaces often have reverb and echo characteristics, so positioning your subject away from bare walls can help achieve a more professional sound. The DJI Mic 2’s noise-cancellation features work excellently in these environments, but don’t rely on them entirely—good mic placement always trumps post-processing fixes.
Outdoor and Event Recording
Outdoor recordings present unique challenges that require different approaches. Wind noise remains the primary enemy of clean audio when shooting outside. Always use the foam windscreen provided with your DJI Mic 2, and in particularly windy conditions, consider adding a furry windshield for additional protection.
Increase your monitoring vigilance during outdoor shoots, as unpredictable sound sources like passing vehicles, aircraft, or sudden environmental changes can affect your audio quality unexpectedly.
Troubleshooting Common Connection Issues
Even with straightforward setup processes, you might occasionally encounter connection problems between your DJI Mic 2 and Osmo Pocket 3. The most common issue involves the Osmo Pocket 3 not recognizing the connected microphone. If this happens, first check that the USB-C cable is fully inserted into both devices—sometimes a slightly loose connection prevents proper recognition.
Try disconnecting and reconnecting the cable, ensuring you hear or feel the satisfying click that indicates a secure connection. If the physical connection seems fine but audio isn’t being captured, verify that you’ve selected the correct audio input source in the Osmo Pocket 3’s settings menu.
The device won’t automatically switch to the external microphone in all cases, especially if you’ve previously used different audio sources. Navigate to your audio settings and manually select the DJI Mic 2 as your input device.
Another potential issue involves firmware mismatches between devices. If you’ve recently updated one device but not the other, compatibility issues might arise. Check for available updates on both the Mic 2 and Osmo Pocket 3, and install any pending firmware before attempting to reconnect.
Battery-related problems can also manifest as connection issues. If either device has critically low battery, it may fail to maintain a stable connection or might disconnect unexpectedly during recording.
Advanced Tips for Professional-Quality Audio
Going from good to great in your audio capture involves some higher-order thinking. First, let’s take it back to what exactly audio monitoring is. Audio monitoring: With a connected pair of headphones, the incoming audio on an Osmo Pocket 3 will be played back through its audio output source.
Which is priceless for detecting issues on the fly instead of in post. Invest in a closed-back headphone that isolates external sound, so you can clearly hear what is being recorded without noise from the environment influencing your judgment.
Use the built-in DJI Mic 2 recording as a backup experiment. The transmitter can also record audio directly to its internal storage, so you have a failsafe should something go wrong with the wireless send or connection to your Osmo Pocket 3.
This duplication has saved numerous rushes when there was an unforeseen technical problem. You should also learn about gain staging: getting the right input levels at every step in your audio signal. The idea is to capture the loudest signal possible without clipping, which means you are going to want to aim for levels peaking around -6dB to -12dB so that you will have enough headroom for unexpected loud peaks.
Maintaining Your Equipment for Reliable Connections
Long-term reliability of your connection between the DJI Mic 2 and Osmo Pocket 3 depends significantly on how well you maintain both devices. Keep the USB-C ports clean and free from debris by occasionally using compressed air to blow out any accumulated dust. Avoid forcing cables into ports, as this can damage the internal connections and lead to unreliable connectivity. Store your equipment in a protective case when not in use, particularly if you frequently shoot in dusty or humid environments.
Battery health directly impacts connection stability. Lithium-ion batteries, like those used in the DJI Mic 2 and Osmo Pocket 3, perform best when not repeatedly discharged to zero. Try to recharge when they reach around 20-30% capacity.
For long-term storage, keep batteries at approximately 50% charge to maximize their lifespan. Regular firmware updates also contribute to maintaining optimal performance—DJI’s updates often include improvements to connection protocols, battery management, and overall system stability.
Conclusion
Learning how to plug in the DJI Mic 2 into the Osmo Pocket 3 absolutely takes your production ability up a few gnats! We’ve already taken a look in the past at some of the key methods of switching between these, such as reliable USB-C wired to super-flexible
Bluetooth support and optimization for different recording situations. Keep in mind that good audio really does go beyond plugging in a cable and having everything just ‘work’–it involves setting proper gain levels, awareness of your environment, equipment upkeep, and real-time monitoring.
DJI Mic 2 and Osmo Pocket 3 can be one of the most compact audio-visual setups in these times. If you follow this article and the troubleshooting steps above, and take our tips to the next level, you should be well on your way to capturing broadcast-quality audio in almost any situation.
Spend some time getting used to these connections and optimization tips before your big shoots, and you will have the confidence as wellas become a habit that separates professional productions from amateur recordings. So you’ve got it, now just pick up your gear, get that connection, and start getting some content to match the level of quality that is already obvious in this thing’s image capture capabilities.