

Hooking up your DJI controller to WiFi may not seem like a big deal, but it’s one of those must-have skills that can really take your drone flying game to the next level. Whether you’re getting ready for firmware updates, flight logs, or syncing your controller with the DJI Fly app, a strong WiFi connection allows you to access features that are more advanced. To connect a DJI controller to Wi-Fi: on RC/RC2/RC3, swipe down, hold the Wi-Fi icon, choose your network, and enter the password. On RC-N1, connect through your phone’s Wi-Fi settings or the DJI Fly app.
The following are ways to make sure that your transmitter and drone actually bind with one another, along with some general settings that could help you get up and flying. Many pilots experience annoyance during this step because sometimes it’s different between models, or some settings aren’tobvious.
This ultimate guide will take you step by step through the entire process of connecting your DJI controller to WiFi, including multiple types of controllers, what can go wrong (and how to fix it), and how to get yourself in a great place for every.

What Is DJI Controller WiFi Connectivity
Before we get into the details of how to connect, you may want to know why WiFi is actually important for your DJI controller. Now, modern DJI controllers like the RC Pro, RC-N1, and Smart Controller are far more than just dumb remote controls; they’re powerful devicesthat runs on Android-based operating systems that have their own internet needs and ask that you be kind enough to keep them online at all times.
When you connect your controller to Wi-Fi, you’re bringing online all those essential functions that once required connectivity, downloading mapping data, accessing DJI’s server for aircraft activation, updating its firmware, and syncing flight records with your DJI account.
The controller itself is pretty much a smart device, connecting your drone with DJI’s ecosystem to ensure and enhance your flight experience with the latest software upgrades and safety features.
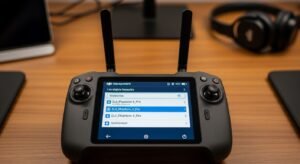
How to Connect DJI Controller to WiFi: RC Pro and Smart Controller
Accessing WiFi Settings
Step 1: Power on your DJI RC Pro or Smart Controller by pressing and holding the power button until the screen illuminates.
Step 2: Once the home screen appears, swipe down from the top of the screen to reveal the quick settings panel, similar to how you’d access notifications on a smartphone.
Step 3: Locate the WiFi icon in the quick settings menu—it typically appears as a fan-shaped symbol with radiating lines.
Step 4: Tap and hold the WiFi icon for 2-3 seconds. This action will take you directly to the full WiFi settings menu rather than just toggling WiFi on or off.
Connecting to Your Network
Step 5: In the WiFi settings menu, ensure the WiFi toggle at the top is switched to the “On” position. The controller will automatically begin scanning for available networks.
Step 6: Wait 5-10 seconds for the network list to populate. You’ll see available networks listed with their signal strength indicated by bars.
Step 7: Tap on your desired WiFi network from the list. If your network doesn’t appear, tap the “Scan” or refresh button to search again.
Step 8: Enter your WiFi password using the on-screen keyboard. Pay close attention to uppercase and lowercase letters, as passwords are case-sensitive.
Step 9: Tap “Connect” or “OK” to establish the connection. The controller will attempt to authenticate with your network.
Step 10: Once connected successfully, you’ll see “Connected” appear beneath your network name, and the WiFi icon in the status bar will display full signal strength.
Step-by-Step Troubleshooting for Wi-Fi Connectivity
| Problem | Solution |
| Controller doesn’t detect Wi-Fi | Ensure Wi-Fi is 2.4 GHz, restart controller and app |
| Update fails | Check storage space on phone, restart download |
| Frequent disconnections | Reduce interference, move closer to router |
| App not pairing | Reinstall DJI Fly app, check Bluetooth |
Connecting Standard Remote Controllers (RC-N1 and Similar Models)
The process for connecting standard DJI controllers that pair with your smartphone is slightly different since these controllers don’t have built-in screens. When you need to connect a DJI controller to WiFi using models like the RC-N1, you’re actually managing WiFi through your connected mobile device rather than the controller itself.
The controller communicates with your drone via OcuSync or other transmission systems, while your smartphone handles internet connectivity. Simply connect your phone to WiFi as you normally would before launching the DJI Fly or DJI GO app.
The app will utilize your phone’s WiFi connection to download updates, sync data, and access online features while the controller manages flight controls independently through its dedicated transmission frequency.
How to Connect DJI Controller to WiFi for Firmware Updates
Preparing for Updates
Firmware updates are one of the primary reasons you’ll need to connect your DJI controller to WiFi, and the process requires a stable internet connection to download potentially large files. Start by ensuring your controller has at least 50% battery charge, as updates can take 15-30 minutes and should never be interrupted mid-process.
Navigate to the DJI Fly or relevant app, then access the settings menu where you’ll typically find a “Firmware Update” or “About” section. The app will check DJI’s servers for available updates once connected to WiFi.
Downloading and Installing Updates
Step 1: With your controller connected to WiFi, open the DJI Fly app and tap the three-dot menu icon in the top-right corner.
Step 2: Select “About” from the dropdown menu to view your current firmware version.
Step 3: If an update is available, you’ll see a red notification dot and an “Update” button. Tap this button to proceed.
Step 4: Review the update changelog to understand what improvements or fixes are included, then tap “Download.”
Step 5: Wait for the download to complete—this can take anywhere from 3 to 20 minutes depending on your WiFi speed and the update size.
Step 6: Once downloaded, tap “Update Now” and follow the on-screen instructions. Do not power off your controller or disconnect from WiFi during installation.
Step 7: The controller will restart automatically once the update completes. This restart is normal and indicates successful installation.
Troubleshooting Common WiFi Connection Issues
Network Not Appearing
If your WiFi network doesn’t appear in the available networks list, several factors could be responsible. First, verify that your router is broadcasting on the 2.4GHz frequency band, as some DJI controllers have limited or no support for 5GHz networks depending on the model.
Check your router settings to ensure the SSID broadcast is enabled—hidden networks won’t appear in standard scans. Distance also matters; if your controller is too far from the router, the signal may be too weak to detect. Try moving closer to your wireless access point, ideally within 15-20 feet with minimal obstacles between the devices.
Connection Drops or Instability
Experiencing frequent disconnections or unstable WiFi on your DJI controller often points to interference or network congestion issues. WiFi networks in densely populated areas compete with dozens of other networks, cordless phones, and electronic devices operating on similar frequencies.
Access your router’s administration panel and try changing the WiFi channel to one with less interference—channels 1, 6, or 11 are typically best for 2.4GHz networks. Additionally, check if your router’s firmware needs updating, as outdated router software can cause compatibility issues with newer devices.
Position your controller with a clear line of sight to the router when performing critical tasks like firmware updates to minimize potential disconnections.
Best Practices for DJI Controller WiFi Management
Optimizing Connection Quality
Use dedicated 2.4GHz networks: Create a separate 2.4GHz network specifically for your DJI equipment if your router supports it, reducing interference from other household devices.
Maintain updated firmware: Regularly check for controller and router firmware updates, as manufacturers continually improve wireless connectivity performance.
Avoid peak usage times: Download large updates during off-peak hours when fewer devices are competing for bandwidth on your network.
Keep security current: Use WPA2 or WPA3 encryption on your network—avoid outdated WEP security, which some modern devices may reject.
Document your settings: Save your WiFi passwords and network configurations in a secure location for quick reference during field operations.
Security Considerations
When connecting your DJI controller to WiFi, especially in public locations, exercise caution about which networks you trust. Public WiFi networks at parks, cafes, or event venues might be convenient for downloading updates, but they can expose your device to security risks.
If you must use public WiFi, avoid accessing sensitive accounts or entering personal information through the controller. Consider using your smartphone’s mobile hotspot as a secure alternative when away from home—most modern phones create encrypted connections that are safer than public networks.
For home networks, ensure you’ve changed your router’s default administrator password and that your WiFi password is strong, combining letters, numbers, and symbols to prevent unauthorized access.
Connecting to WiFi for Specific DJI Controller Models
Different DJI controller models have subtle variations in their WiFi connection processes that are worth understanding. The DJI RC Pro features a full Android interface with standard Android WiFi settings, making it similar to connecting a tablet.
The Smart Controller uses a modified Android interface with DJI’s custom skin but follows nearly identical steps. The Cendence controller, popular among professional pilots, requires connecting through the DJI GO 4 app and has specific compatibility requirements.
Meanwhile, controllers that rely on smartphone connectivity like the standard Mavic controller or RC-N1 depend entirely on your phone’s WiFi capabilities.
Always consult your specific controller’s manual for model-specific quirks, as DJI occasionally updates connection procedures through firmware releases that might introduce new menu layouts or settings locations.
Final Thoughts
Mastering how to connect DJI controller to WiFi is an essential skill that unlocks your drone’s full potential, from seamless firmware updates to comprehensive flight data management. We’ve covered the complete process across various controller models, walked through troubleshooting common connection issues, and explored best practices for maintaining stable, secure wireless connectivity.
Remember that each controller model may have slight variations in menu layouts or connection steps, but the fundamental principles remain consistent: access WiFi settings, select your network, authenticate with your password, and verify connection success.
Whether you’re a hobbyist flying recreationally or a professional pilot managing commercial operations, reliable WiFi connectivity ensures your equipment stays current with the latest features and safety improvements.