

How to connect a microphone to iPhone is something many creators and podcasters want to know. The iPhone’s built-in mic works for basic recordings. But it can struggle with background noise and low volume. Using an external microphone makes your videos, calls, and podcasts sound much better. You can use a clip-on lavalier mic, a USB microphone, or a wireless one. Knowing the right way to connect it is important. In this guide, we will show step by step how to connect a microphone to iPhone. We will also explain how to check it works and pick the best setup for your needs.
Why Use an External Microphone with an iPhone
Many people think the iPhone’s built-in mic is enough. For quick recordings or calls, it works fine. But if you want clear, professional audio, it often falls short. Background noise, low volume, or muffled sound can ruin your videos, podcasts, or interviews. Using an external microphone fixes these issues. It makes your recordings sound clean and easy to listen to.
Better Audio for Videos and Podcasts
A good external microphone captures sound more clearly. Your voice will be louder and sharper. If you are recording a YouTube video, vlog, or a podcast on your iPhone, the difference is huge. Lavalier microphones, USB microphones, and shotgun mics all improve audio quality. You will notice less background noise and fewer echoes.
Clearer Calls and Online Meetings
External microphones are not just for recordings. They also make calls and meetings clearer. If you often use your iPhone for Zoom or FaceTime, an external mic can help others hear you better. It reduces distractions and makes your voice sound natural.
When an External Mic Really Matters
If you record outside, in busy places, or in echoey rooms, an external microphone is a must. It makes your iPhone recordings professional. You will sound more confident and your audience will enjoy listening.
Using an external microphone with your iPhone is simple but makes a big difference. It is a small investment for much better sound. By choosing the right mic and connecting it correctly, your audio will improve for every video, podcast, or call you make.
Types of Microphones That Work with iPhone
Not all microphones work the same with an iPhone. Knowing the main types helps you pick the right one for your needs. Some are small and clip-on, while others are bigger or wireless. Each has its own use, and choosing the right type makes your recordings much better.
Lavalier (Clip-On) Microphones
Lavalier microphones are small mics you clip onto your clothes. They are perfect for talking videos, interviews, or online classes. Lavalier mics capture your voice clearly without picking up too much background noise. They are easy to carry and usually connect with a Lightning or USB-C adapter.
Shotgun Microphones
Shotgun microphones are long and directional. They focus on the sound in front of them while ignoring noise from the sides and back. They are great for vlogging, outdoor filming, or situations where you need focused audio. Shotgun mics often require a small stand or mount to attach to your iPhone.
USB Microphones
USB microphones are popular for podcasts, voiceovers, and professional recordings. Some connect directly to iPhones with USB-C or Lightning adapters. They provide clear, loud, and high-quality audio. They are larger than lavalier mics but excellent for indoor recording.
Wireless Microphones
Wireless microphones are convenient for movement. They work with a small receiver connected to your iPhone. Wireless mics are useful for live videos, presentations, or interviews where you need to walk around.
Each microphone type has its strengths. Picking the right one depends on your recording style, environment, and purpose. Knowing the differences will make connecting a microphone to iPhone much easier and your audio much better.
Understanding iPhone Ports and Compatibility
Before connecting a microphone to iPhone, it’s important to understand the ports. Not all iPhones have the same connection type. Knowing whether your iPhone uses Lightning or USB-C helps you choose the right microphone and adapter.
Lightning Port iPhones
Most iPhones from older models up to iPhone 14 use a Lightning port. If your microphone has a 3.5mm plug or USB connection, you will need a Lightning adapter. Cheap adapters may not work properly, so it’s better to use Apple-certified ones. Using the right adapter ensures your external microphone records clear sound without interference.
USB-C iPhones
Newer iPhones, like iPhone 15 and above, have USB-C ports. This port supports faster data transfer and works well with USB-C microphones. You may still need an adapter for 3.5mm mics. USB-C gives more options for professional microphones and makes it easier to connect audio interfaces if needed.
TRRS vs TRS Microphones
TRRS and TRS are types of plugs on microphones. TRRS plugs work directly with iPhones using Lightning or USB-C adapters. TRS plugs usually need a special adapter to connect. Knowing your microphone type helps prevent connection issues and ensures your audio records correctly.
Understanding ports and compatibility before buying a microphone saves time and avoids frustration. Once you know your iPhone type, you can pick the right microphone and adapter and get clear, high-quality sound for videos, calls, podcasts, or interviews.
What You Need Before Connecting a Microphone
Before connecting a microphone to iPhone, it’s important to have the right tools. Using the correct adapters, cables, and apps ensures your recordings are smooth and clear. Preparing everything in advance saves frustration and makes the process simple.
Adapters and Cables
Most iPhones need an adapter to connect an external microphone. Older iPhones with Lightning ports require a Lightning-to-3.5mm adapter. Newer USB-C iPhones may need a USB-C or Lightning adapter depending on the microphone. TRRS microphones work directly, but TRS mics often need a special adapter. Good-quality cables prevent interference and maintain clear audio.
Audio Interfaces
Some professional USB microphones need an audio interface. An audio interface allows your iPhone to read the microphone’s digital signal. You only need it for certain mics, like large condenser USB microphones. For lavalier or basic USB mics, an interface is usually not necessary.
App Requirements
Not all apps automatically recognize external microphones. Recording apps like Voice Memos, GarageBand, or video apps often work seamlessly. Some podcasting or streaming apps may require you to select the microphone manually in settings. Checking app compatibility ensures your iPhone uses the mic correctly.
By having the right adapter, cable, and app ready, you can connect any microphone to your iPhone without issues. This preparation makes recording simple and ensures your audio sounds clear and professional, whether for video, podcasts, or online meetings.
How to Connect a Microphone to iPhone (Step-by-Step)
Connecting a microphone to iPhone may seem tricky at first. But once you know the right steps, it is simple and quick. Different microphones use different connections. Lavalier mics, USB microphones, shotgun mics, and wireless mics all have slightly different setups. Following these steps ensures your iPhone recognizes the microphone and records clear audio.
Connecting a Lavalier (Clip-On) Microphone
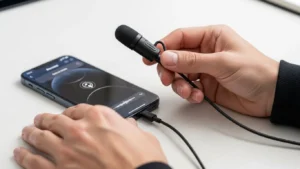
Lavalier microphones are small and easy to use. First, check your iPhone port. For Lightning iPhones, plug the mic into a Lightning-to-3.5mm adapter. For USB-C iPhones, use a USB-C or Lightning adapter depending on your mic. Clip the mic to your clothing near your mouth. Open a recording app like Voice Memos or GarageBand. Test the sound to make sure your voice is loud and clear.
Connecting a Shotgun Microphone
Shotgun microphones are directional and capture focused sound. Connect the mic to your iPhone with the correct adapter. Mount it on a small stand or a tripod if needed. Position the mic so it points toward the sound source. Open your recording app and check the audio levels. Adjust the distance for the best sound quality.
Connecting a USB Microphone
USB microphones are popular for podcasts and voiceovers. Use a USB-C or Lightning adapter to connect it to your iPhone. Some USB microphones need power, so ensure your adapter supports it. Open your recording app and select the microphone in the settings if required. Speak or test with music to check the sound.
Connecting a Wireless Microphone
Wireless microphones use a small receiver that connects to your iPhone. Turn on the mic and receiver, pair them if needed, and plug the receiver into your iPhone. Open the recording app and test the connection. Move around to make sure the sound stays consistent.
Following these steps makes connecting any microphone to iPhone easy. Once connected, you will get clear audio for videos, podcasts, or calls. Knowing how to connect your mic correctly saves time and ensures professional-quality sound every time.
How to Check If Your iPhone Is Using the External Microphone
After connecting a microphone to iPhone, it’s important to make sure it works. Sometimes the iPhone still uses the built-in mic by default. Checking early saves you from recording poor audio for videos, podcasts, or calls.
- Quick Test Methods: The easiest way to check is to open a recording app like Voice Memos or GarageBand. Start recording and speak into your external microphone. Play back the recording. If the sound is louder and clearer than usual, your iPhone is using the external mic.
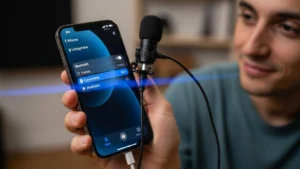
- iPhone Settings Check: Some apps allow you to select the microphone manually. Open the app settings and look for audio or input options. Make sure the external microphone is selected. This ensures the iPhone captures audio from the correct device.
- App-Level Confirmation: Not all apps automatically detect external microphones. Video apps, live streaming apps, and podcasting apps may have an input menu. Check the menu before starting your recording. Confirm the external mic is active.
Troubleshooting Quick Fixes
If your iPhone is not using the external microphone, try these steps:
- Disconnect and reconnect the mic.
- Use a different adapter if necessary.
- Restart the app or iPhone.
- Check that the mic is compatible with your iPhone port.
Checking that your external microphone is working properly ensures your recordings are clear and professional. With a quick test and app confirmation, you can avoid mistakes and get high-quality sound every time you use your iPhone.
Common Problems and How to Fix Them
Even after connecting a microphone to iPhone, you may face some issues. Knowing the common problems and their fixes helps you avoid frustration and get clear audio every time.
Microphone Not Working
Sometimes your iPhone does not recognize the external microphone. First, disconnect and reconnect the mic. Make sure you are using the correct adapter for your port—Lightning or USB-C. If the mic still does not work, try a different app like Voice Memos or GarageBand. Cheap or non-certified adapters can also cause issues, so using a certified adapter often solves the problem.
No Sound or Low Volume
If the recording is too quiet or has no sound, check the microphone type. TRS mics may need a special adapter. Make sure the mic is close to your mouth or sound source. Some apps allow you to adjust input levels. Increasing the gain slightly can improve volume without causing distortion.
Crackling or Distorted Audio
Crackling or distorted sound usually comes from poor connections or interference. Check that cables and adapters are fully plugged in. Keep your mic and iPhone away from other electronics. Wireless microphones may need battery replacement or better pairing. Adjust the distance between the mic and the sound source for a cleaner signal.
General Tips
- Test your microphone before recording important videos or podcasts.
- Keep your microphone firmware or app updated if applicable.
- Clean your mic and adapter ports to prevent dust or obstruction.
By understanding these common problems, you can fix most issues quickly. This ensures your iPhone recordings always sound professional. Proper setup and testing will save time and prevent poor audio quality for podcasts, video content, or calls.
Tips for Getting the Best Audio Quality on iPhone
Connecting a microphone to iPhone is just the first step. To get clear, professional sound, you need a few simple tips. These small steps make a big difference in your recordings.
Proper Microphone Placement
Where you place your microphone matters a lot. Lavalier mics should be clipped near your mouth, usually on your collar. Shotgun mics should point toward the sound source. USB mics work best if they are about 6–12 inches from your mouth. Keeping the mic at the right distance reduces background noise and makes your voice sound natural.
Reduce Background Noise
Choose a quiet space whenever possible. Close windows, doors, and turn off fans or noisy electronics. If you are recording outdoors, use a windscreen or foam cover on the mic. This helps reduce wind and ambient sounds, giving your iPhone recordings cleaner audio.
Use the Right App Settings
Some apps allow you to adjust input levels. Make sure the mic is selected in the app settings. Adjust the gain if the sound is too quiet or too loud. Testing before recording a long session prevents mistakes.
Simple Editing Tips
Even small edits can improve audio quality. You can remove background noise, normalize volume, or cut unwanted parts. Apps like GarageBand or Audacity make it easy. Clean audio makes your videos, podcasts, or calls sound more professional and enjoyable to listen to.
Following these tips ensures your iPhone audio recordings are clear, strong, and easy to understand. Proper mic placement, noise control, and app settings make a noticeable difference. Whether you are recording videos, podcasts, or online meetings, these small steps will help you get the best results every time.
Final Thoughts
Connecting a microphone to iPhone can make a big difference in your recordings. The iPhone’s built-in mic works for basic audio, but an external microphone gives clearer, louder, and more professional sound. Choosing the right type, whether it’s a lavalier, USB, shotgun, or wireless mic,c depends on your recording style and environment.
Testing your microphone, using the correct adapter, and picking the right app ensures your iPhone captures the best audio. Paying attention to mic placement, background noise, and simple app settings improves quality even more.
With the right setup, your videos, podcasts, and calls will sound professional every time. Taking a little time to prepare makes a noticeable difference in how others hear your voice.
Frequently Asked Questions (FAQs)
Can I connect any microphone to iPhone?
Not all microphones work directly. Lavalier, USB, shotgun, and wireless mics are popular. Some need adapters to connect to Lightning or USB-C ports.
Do I need an adapter to connect a mic to iPhone?
Yes. Most external microphones require a Lightning-to-3.5mm or USB-C adapter. TRRS mics often work directly, but TRS mics usually need a special adapter.
How do I know if my iPhone is using the external mic?
Open a recording app like Voice Memos or GarageBand. Speak into the mic and play back the recording. If the audio is clear and louder, your iPhone is using the external microphone.
Which microphone is best for iPhone videos?
Clip-on lavalier mics are ideal for talking videos. Shotgun mics work well for outdoor filming. USB microphones are great for podcasts and voiceovers.
Can I use a wireless microphone with iPhone?
Yes. Wireless mics use a small receiver that connects to your iPhone. Make sure the mic is paired with the receiver and the correct app input is selected.